The Ace Workshop is a community lead, driven, and maintained resource. As makers who share space, we all have a role to play beyond simply working on our projects and cleaning up after ourselves, we also work together to maintain and care for our tools. While routine tool repair and maintenance may not be the most glamorous part of woodworking, it’s essential for keeping the tools we love to use in good working order, safe, and ready for use.
In the past, tool maintenance often fell by default on a small group of expert users which lead to volunteer burnout, longer tool down times, and a pervasive bystander culture in the shop. To make this process more inviting and sustainable we realized we needed a way to:
Build a more intentional woodworking tool maintenance culture
Decrease barriers for folks interested in helping out who didn’t know where to start or who were experiencing the imposter phenomenon
Create an inviting pathway for community members of all skill levels to get involved
Make routine workshop care tasks in general more approachable, fun, and beginner-accessible
…and so Workshop Care Night was born;a new beginner-friendly social evening all about working together to care for our tools, make repairs, and practice concepts covered in our Shop Basics class like logging assets and finding information on the wiki.
Why it works:
Maintenance and tool care is wayyyy more fun together!
It’s a great way for new folks to meet people in the woodworking community
Its a beginner-accessible way to get started with tool repair (no fix-it experience needed to help out, there’s tasks for all skill levels)
Tools last longer and work better with regularly scheduled TLC
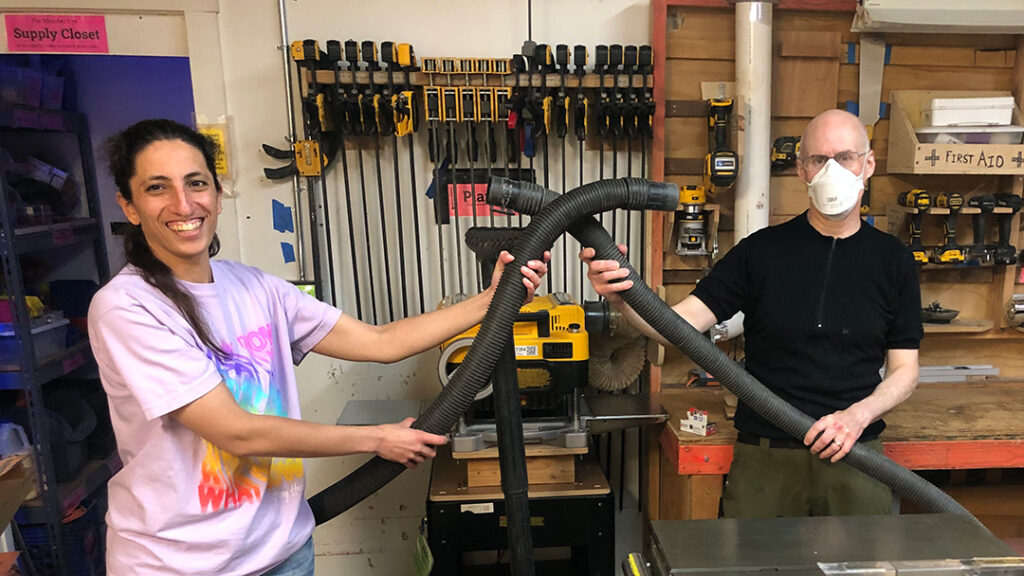
Highlights from Workshop Care Night in April
Team Shop keeps a running list of maintenance tasks for workshop care night. Each event is different, one month the group may align the Table Saw blade, repair a vacuum duct and re-home new tools; the next the group may wax the tool tabletops and replace the cyclone filter.
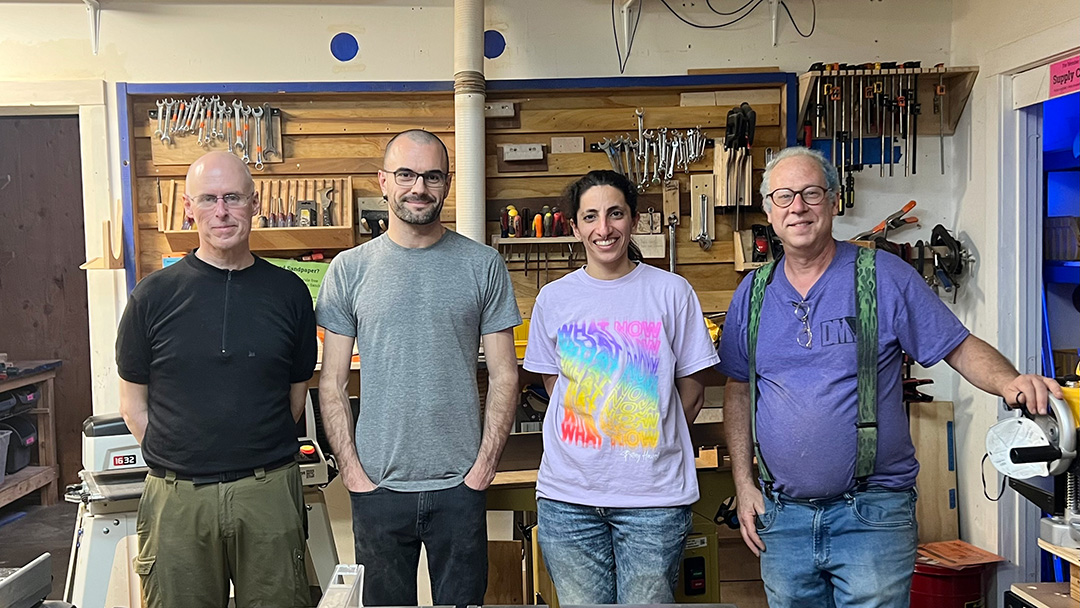
In April, a group of 5 volunteers rolled up their sleeves to tackle a list of maintenance tasks while getting to know one-another and jamming to Groove Salad! This group included folks with a mix of skill sets and experiences levels ranging from woodworking beginners to career professionals.
Here’s a look at just some of what they accomplished over the course of two hours working together:
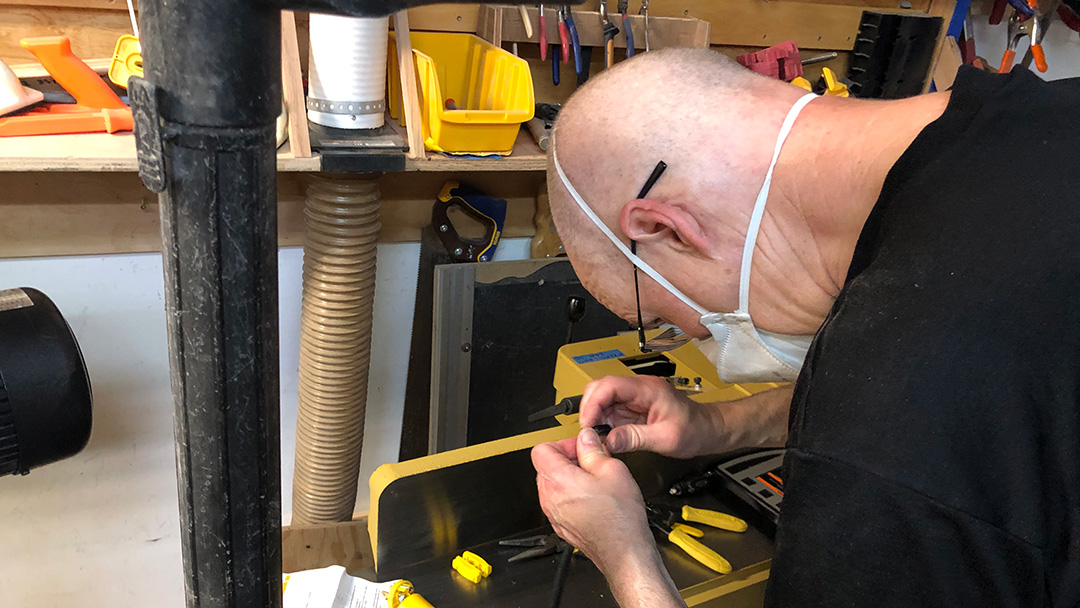
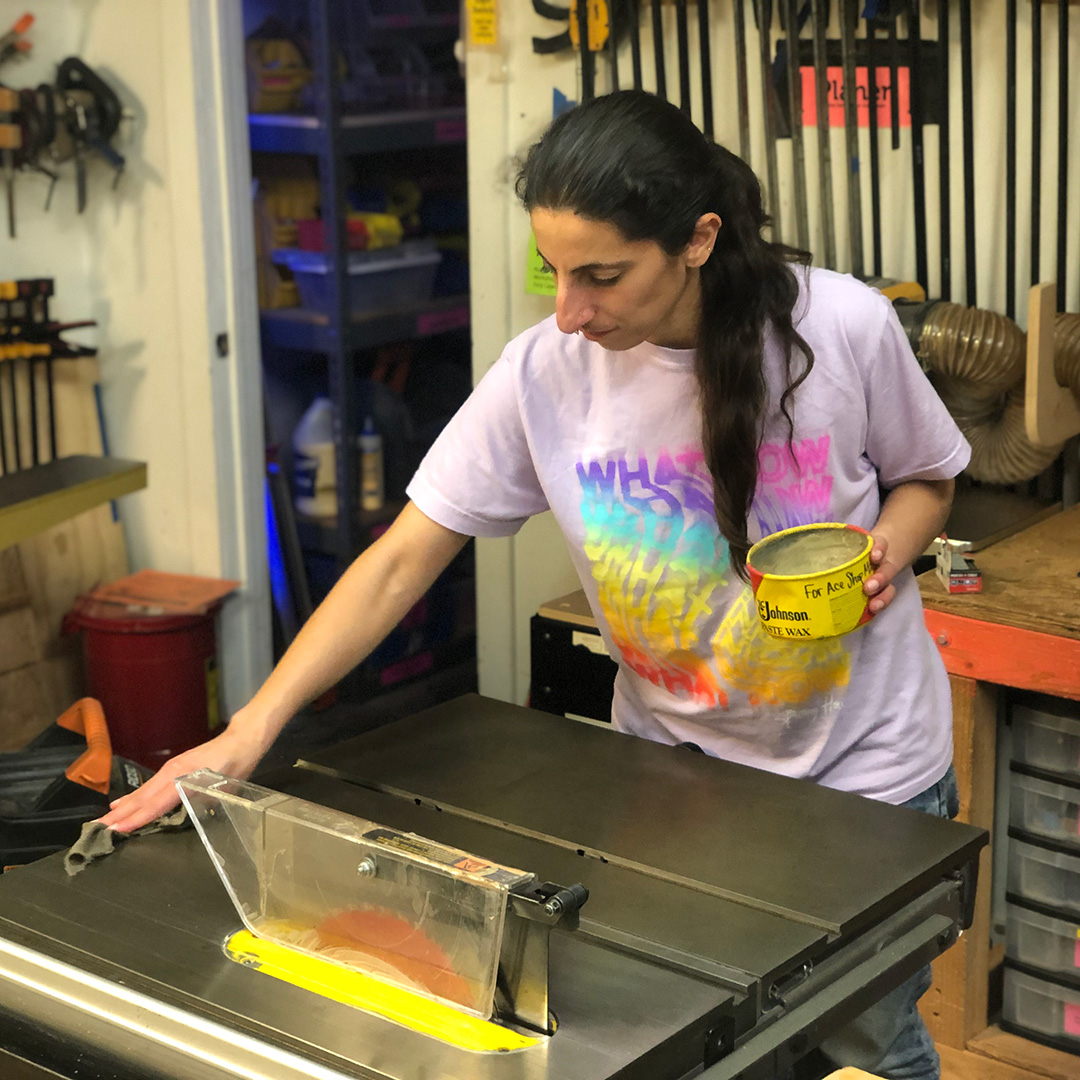
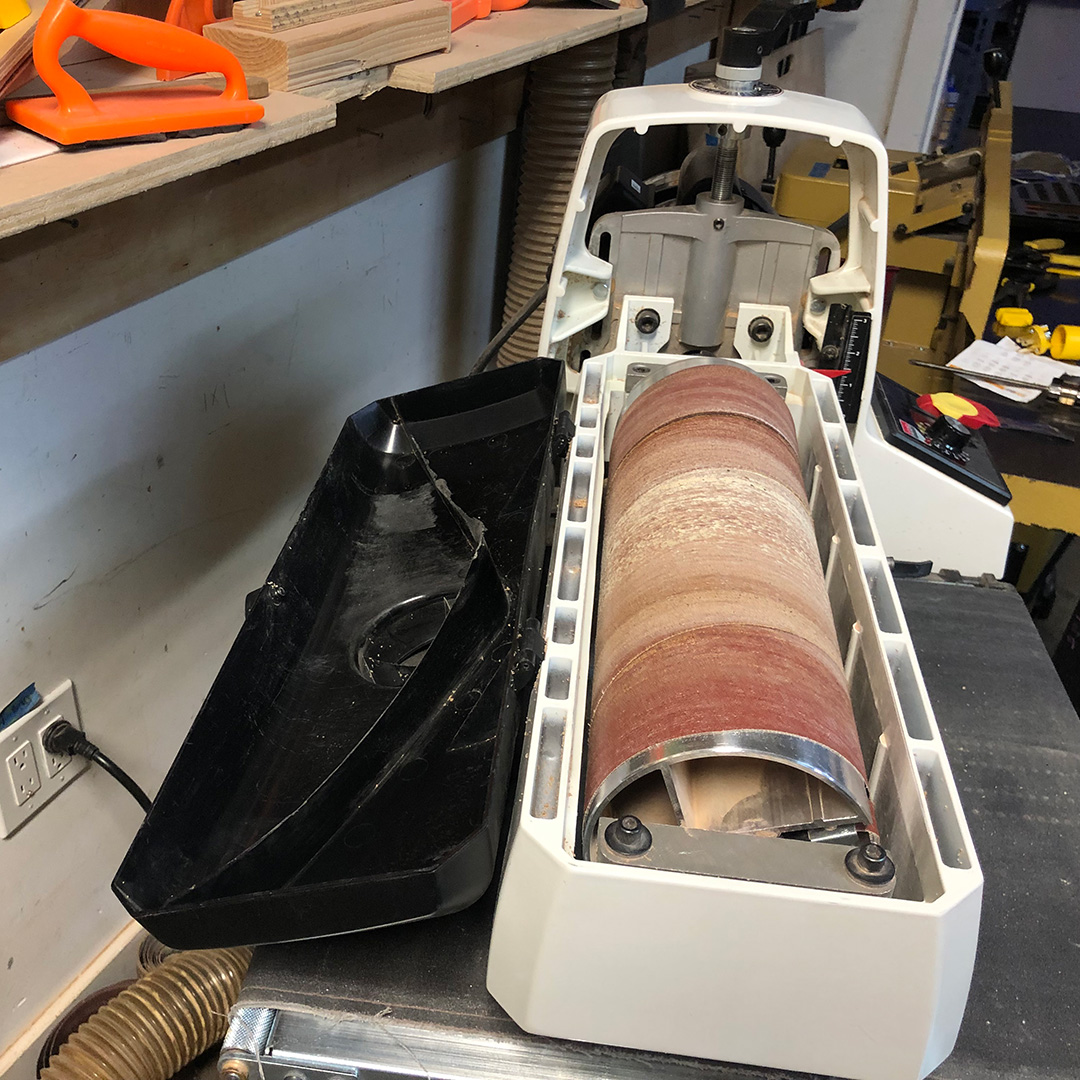
New Member, Greg (he/him/il/le/lui)’s first stop after signing up was rolling up his sleeves and using his electronics know-how to replace the ground pin for the plug for the Ace Jointer at Workshop Care Night.There are meaningful tasks for every skill level. Jacky (they/them), Ace’s Education Manager doesn’t have a lot of experience in workshop care or woodworking, but rolled up their sleeves to deep vacuum machines and wax the steel table tops.Drum Sander before vacuuming.
Tools that get heavy use in the Ace Shop like the Drum Sander, Jointer, Planer, Table Saw and Bandsaw need regular deep vacuuming to get particles deep inside the machine. Removing saw dust from harder to clean areas can lengthen a tools lifespan and helps prevent tool down time.
Team Shop* volunteer and experienced woodworker, Alex (he/him) showed Jacky how to open the top of the Drum Sander since they were unfamiliar with the tool. This kind of peer support and knowledge sharing is deeply embedded in Ace culture along with the belief that everyone has something to contribute of value to the community regardless of skill level.
Drum Sander after deep vacuuming.
It’s not about perfection, it’s about getting it to 90% – Howard
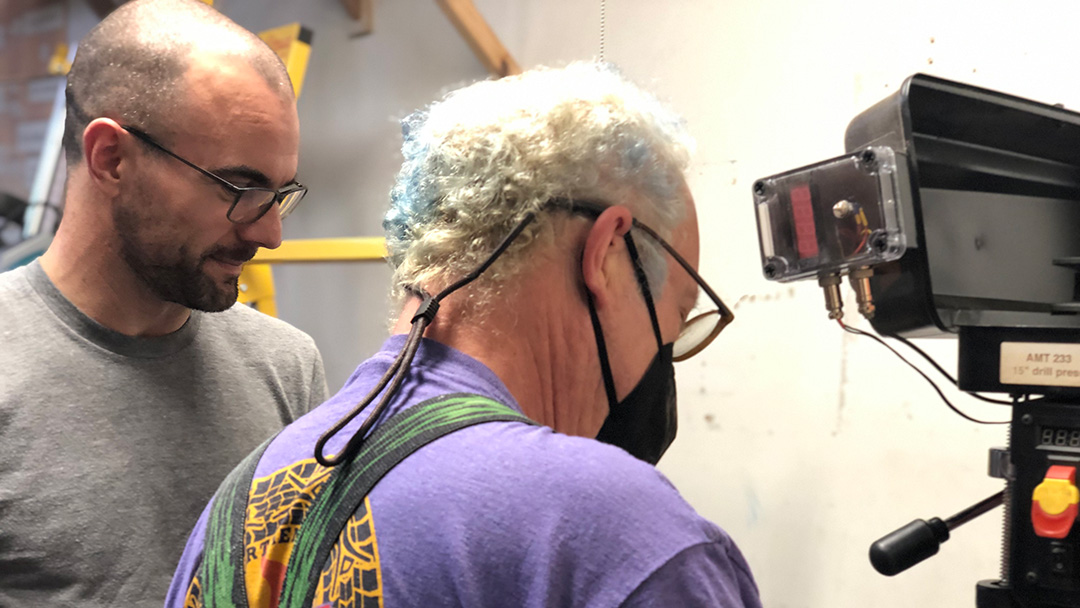
Alex worked on replacing the quill return spring on the Drill Press – the return spring helps the spindle holding the drill bit return to the start position. During the replacement, he called Howard over to assist and verify the repair. At Ace we use the buddy system for repairs to ensure fixes are safe, effective, and verified.By the end of the night, volunteers were a little dusty but feeling good.
*Teams at Ace are groups of volunteers who organize projects, take care of tools, and drive decision making for programs they love. Teams are open to all members and are a fun way to get involved in the Ace Community.
This summer, I had the opportunity to design and build one of the stages for a small annual festival. I’d just returned from a 3-week bike tour through Portugal and Southern Spain, where I’d seen an abundance of amazing historical buildings, from cathedrals to ancient fortresses.
Inspired by the amazingly elaborate details and layers of cultural influence in the architecture I’d seen, I wanted to create an intricate laser-cut plywood design that incorporated LED strips for nighttime stage lighting, but that still looked visually interesting during the daytime performances. It also had to be built ahead of time and easily assembled on-site.
Architectural detail on the Catedral de Sevilla; one of my main reference photos for design elements to use in the stage design.
I originally planned to use Rhino with Grasshopper for creating the design. Grasshopper provides a node-based way of scripting parametric models, and I’ve seen people make some incredible computational designs using it in combination with Rhino. Although I’d really like to learn how to use these programs, and they would have been a good fit for this project, due to time constraints, I stuck to the skills I already have from my background as a mechanical engineer. This meant using OnShape, an online Computer Aided Design (CAD) modeling program like SolidWorks or Autodesk Inventor.
To those unfamiliar with CAD tools that use parametric modeling, it works a bit differently than tools like Illustrator or Paint where you create the design directly. With parametric modeling, you define a series of geometric constraints, dimensions and formulas that define the shapes you’re trying to create.
Parametric models work a little bit like complex equations or a software code, in that it takes time to set them up, but once you do you can go back and adjust the inputs to get near-instant updates without having to recreate or manually tweak the design.
With parametric modeling, as when writing software, it’s good to follow the principle of, “DRY – Don’t Repeat Yourself.”
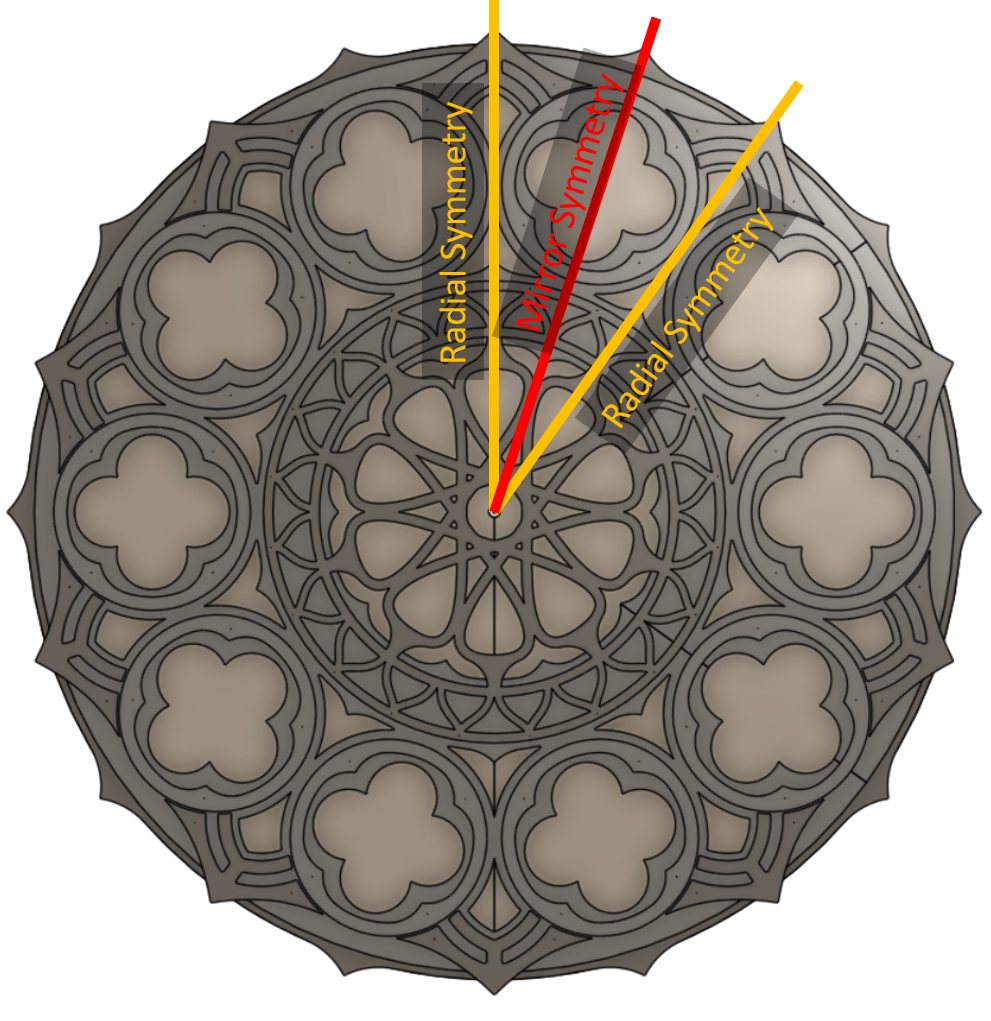
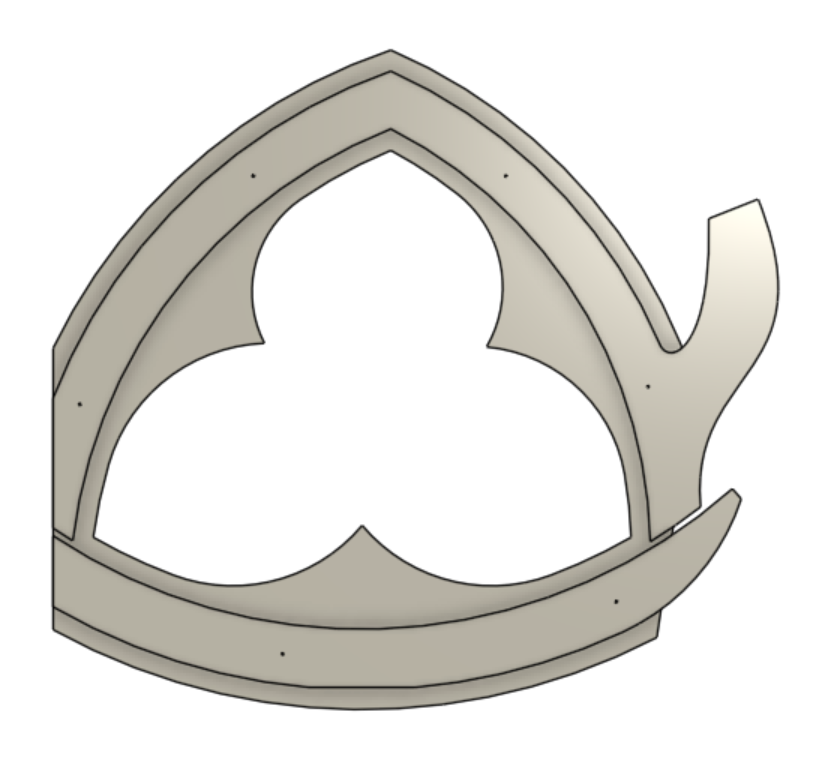
For the rose window element design, the first step was to look for any symmetries. In this case, it meant identifying the smallest “unit cell” that could be replicated to create the full design through mirroring, copying and patterning it. Fortunately every CAD tool has built-in commands to mirror and to rotationally pattern a part. These built-in commands make it easy to create the full piece from a smaller, simpler “unit cell,” while being able to update the original and see how it would look when patterned.
Radial and symmetry axes of the rose window design.Rose window unit cell.
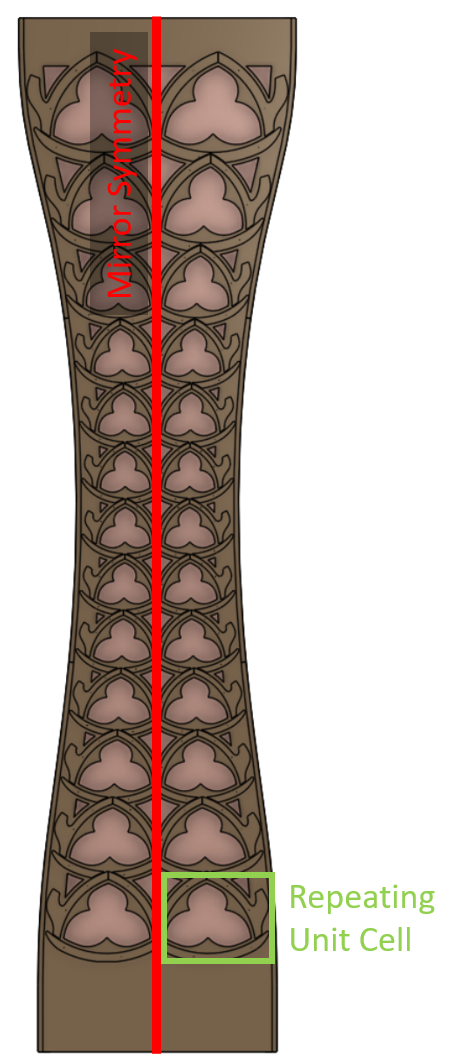
Creating a model for the pillars was more difficult. I wanted to be able to pattern a design along a gentle curve while having it adapt to the width between the curve and the centerline. There’s no built-in CAD command to pattern a part while changing the inputs that define the part (well, there is kind of but not in a way I was able to make work for this design). Instead, I set up a part for the pillar unit cell with different “configurations” where each configuration had the height and width of the bounding shape matching those measured along the curve. This was still a somewhat manual process because, if I changed the shape of the curve, I had to update the width and height of each part configuration to get it to match. That being said, with the curve fixed, I was able to change a single design and have all the instances of the unit cell update—my desired result. It’s worth noting that OnShape actually has its own scripting language, FeatureScript, which I could have used to write a custom command for the result I had hoped to achieve, but didn’t have the time. I plan to explore this approach more in the future.
Identifying symmetry and unit cell pattern in the pillar design.Configurable “unit cell” for the pillar.
All this modeling was to make the files required for the laser cutter, which reads 2D line drawings.
Someone who is proficient at a vector art tool like Illustrator likely could have created the same final design in 1/10th the time it took me to set up this complicated parametric CAD model. That being said, I had fun modeling it this way and I got more familiar with OnShape along the journey!
Once I was happy with the design (by which I mean out of time to continue tweaking it), I exported everything and headed to the laser cutter.
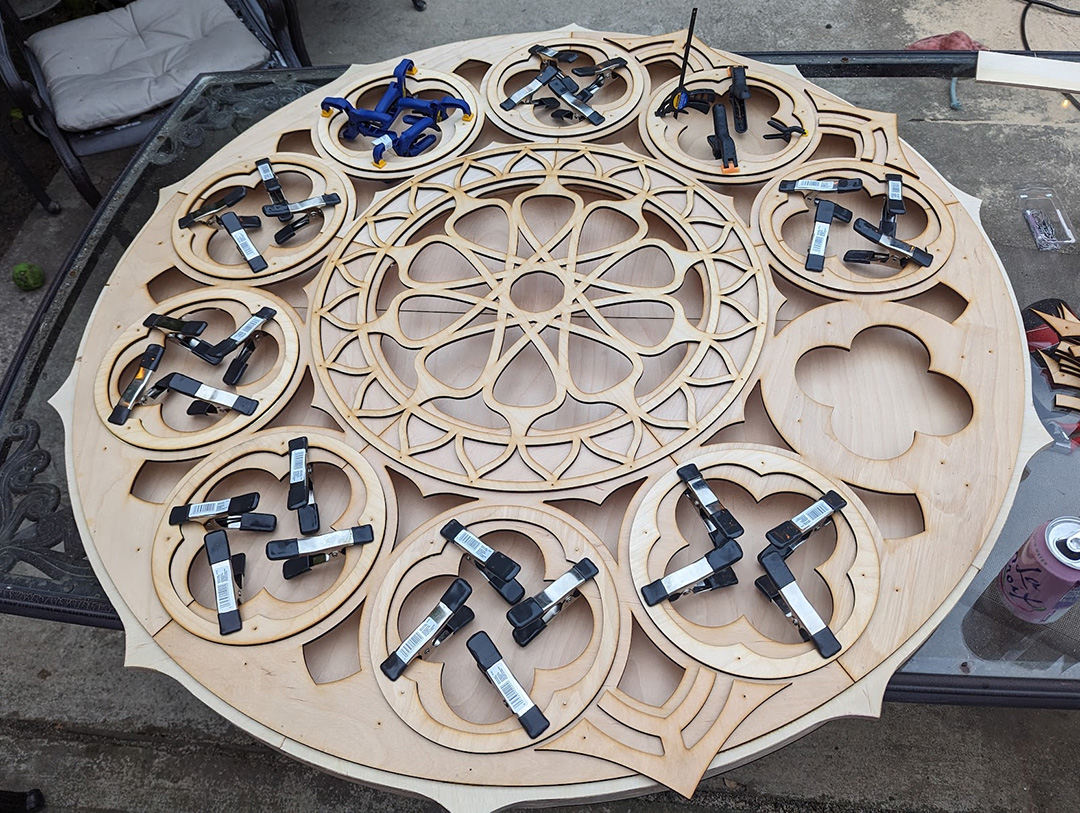
Laser cutting mostly went smoothly, although it took two passes to get all the way through the 1/4″ birch plywood. The main issue for the bigger parts was just getting the plywood to lay flat enough to keep the laser in-focus. I used every magnet in the drawer and could have used even more!
I hit a snag with the high-quality “Exterior Grade” Baltic Birch Plywood I had originally purchased for the project from MacBeath Hardwood. Whatever the manufacturer treated it with to make it exterior grade, prevented the laser from cutting past the first glue layer. After having made this expensive error, I bought the cheaper 4×8′ regular “White Birch” sheets from MacBeath, which they helped me rip into thirds that fit nicely into both the laser-cutter work area and the back of my car. The total cut time was approximately 200 minutes, spread out across several long, late-night sessions. It took far more time to layout and fixture the cuts than actual active cutting time.
Glue layup of the rose window element; could have used even more clamps.
The final assembled pieces have a solid back spaced 1.5″ from the front cutout parts. I cut “rib” parts out of 3/4″ plywood and doubled them up to get the 1.5″ spacing. I then joined the parts with wood glue and a nail gun (the nails are invisible from far away and provided good clamping force while the wood glue dried). This resulted in surprisingly light and stiff parts.
I created the detail on the front of the panels by gluing on smaller parts. This layup was challenging due to the sheer quantity of small parts.
For the pillars where the unit cell had many unique configurations, there were literally hundreds of small parts that all had to go in specific locations!
I added pre-fabricated holes to the laser-cut patterns for small brad nails which made it easy to align the small parts during assembly, and keep everything from sliding around during the glue-up. Once the glue was mostly dried I removed the brad nails so they wouldn’t become a permanent part of the assembly. The back panels are removable for installation and maintenance of LED strips glued along the inside face of the ribs. I used a silicone caulk for the LEDs, which works well as long as the ends of each LED strip are securely attached. The silicone caulk is strong enough to keep the strips in place, but easy to peel off if necessary.
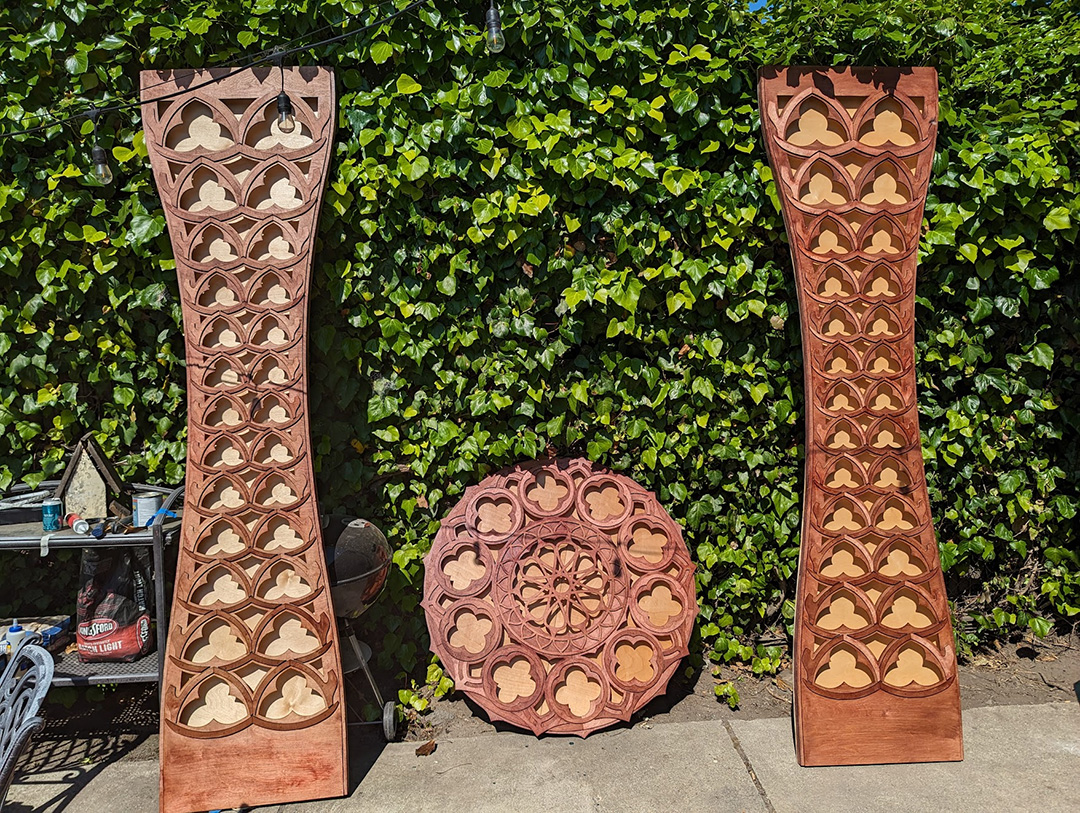
Finished and stained panels.
At the festival, the pieces were in the capable hands of Radiant Atmospheres, an event lighting collective practically next door to Ace. They hooked up the LED strips to a DMX decoder, which let them control them from the same system they were using to drive the rest of the stage lighting and effects. They also brought two rear projection units that set up an ever-shifting psychedelic pattern on the stage backdrop. I was really impressed with the work they did; it’s a bit hard to capture in photos but the stage lighting was gorgeous. All-in-all I’m pleased with how this project came out, and excited to take lessons learned and continue to play with the laser-cutter and other tools at Ace!
Ukrainian artist “Asymmetry” performing with the rose window element behind.
Oh, and the band in the cover image is the enchanting Foxtails Brigade!
What worked:
The alignment holes and brad nails made the glue-up substantially easier; it would have been a real nightmare to get things lined up without them.
In the design I left strategic gaps between parts to create the illusion that some parts were behind others, even though they were on the same layer. This visual trickery seemed to work; I had a few folks tell me they were surprised that it only had two layers.
I loved the effect of the indirect LED lighting on the back panel, especially the regions lit by two different LED strips. It created smooth gradients that I thought were beautiful. The default with LED art is to create more complexity by adding an ever-increasing density of LEDs, but in this case I think less was more. It’s only five unique colors for all three of the panels, but the natural blending on the back panel made it seem more complex than it was. A happy accident of the constraints of the materials/budget I had to work with!
What could be improved:
Creating the design out of hundreds of small parts made assembly incredibly time consuming. Designing for fewer, larger parts with more complexity per part would have cut down on the time it took to assemble everything.
The ribs between the front and back layers were time consuming to make; I “scored” lines onto thick plywood with a light laser pass and then cut them out with a jigsaw at home. This took a long time and was difficult to do accurately, even with the precise guide lines created on the laser cutter. If I were certified on the CNC machine at Ace, that would have been a better way to go. Fortunately, the closest audience members were approximately 15′ away, and most of the mistakes were invisible from that distance.
In hindsight, it would have been interesting to score inset lines from the edges of the parts on the laser-cutter; that would have been an easy way to suggest even more depth & visual interest.
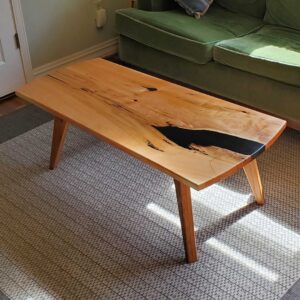
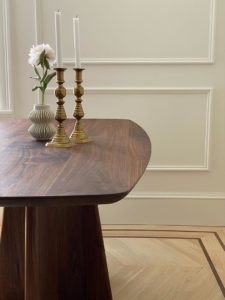
Martin has loads of furniture making experience, but this deep pour resin technique was totally new for him…
Martin’s finished deep pour resin coffee table
The idea for the project came from Martin’s friends who spotted a sleek resin pour table they liked on Four Eyes Furniture. They asked him if he could make them one so he watched a couple videos and decided to give it a go.
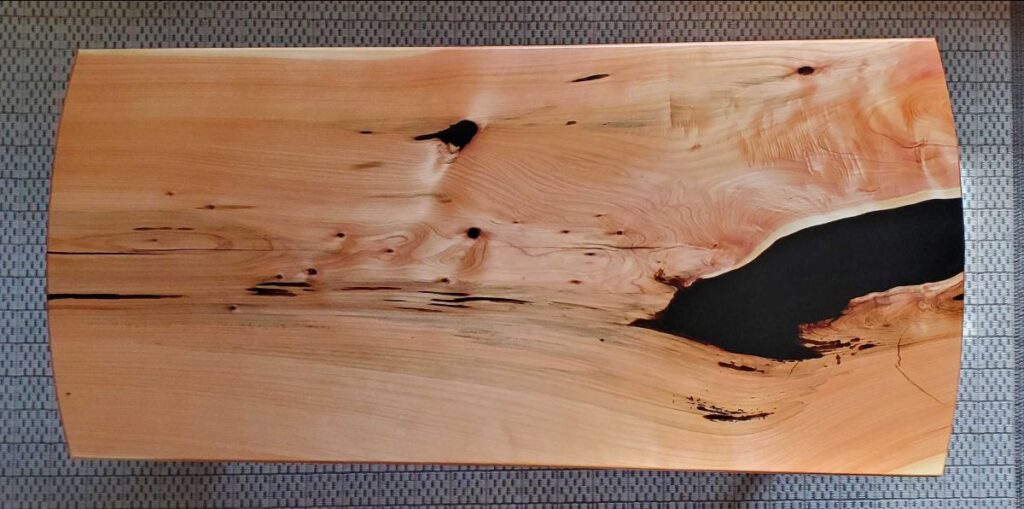
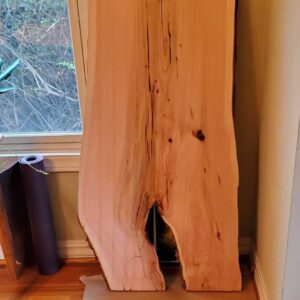
First, he selected a gorgeous slab of kiln dried Monterey Cyprus.
Gorgeous slab of Monterey Cyprus
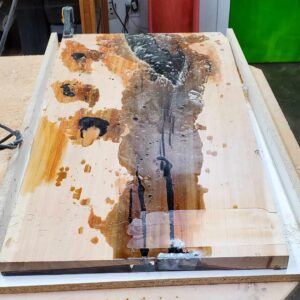
Then he purchased a gallon of Black Epoxy Resin and checked in with the Ace Workshop Community about using Clean Fab for the pour.
Waiting for the first round of epoxy resin to cure.
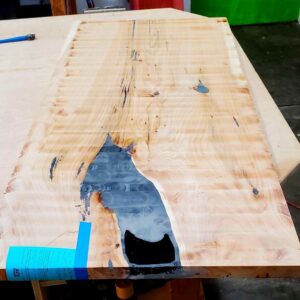
Martin filled the gaps in two rounds; first the top and then the bottom. Each pour took several days to cure before he hand planed it to remove extra resin from the surface.
Martin’s coffee table after hand planing to remove excess resin.
Martin’s tips and takeaways:
Resin costs $$$
It takes time, patience, and a little planning. Each pour takes several days to cure.
After the resin sets, planing the surface by hand is labor intensive. Be prepared to roll up your sleeves.
Monterey Cyprus Wood dust is particularly irritating so well fitting PPE is a must
He’d do it again, but mostly because he has extra resin…
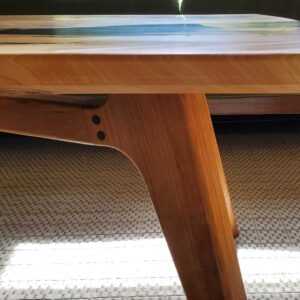
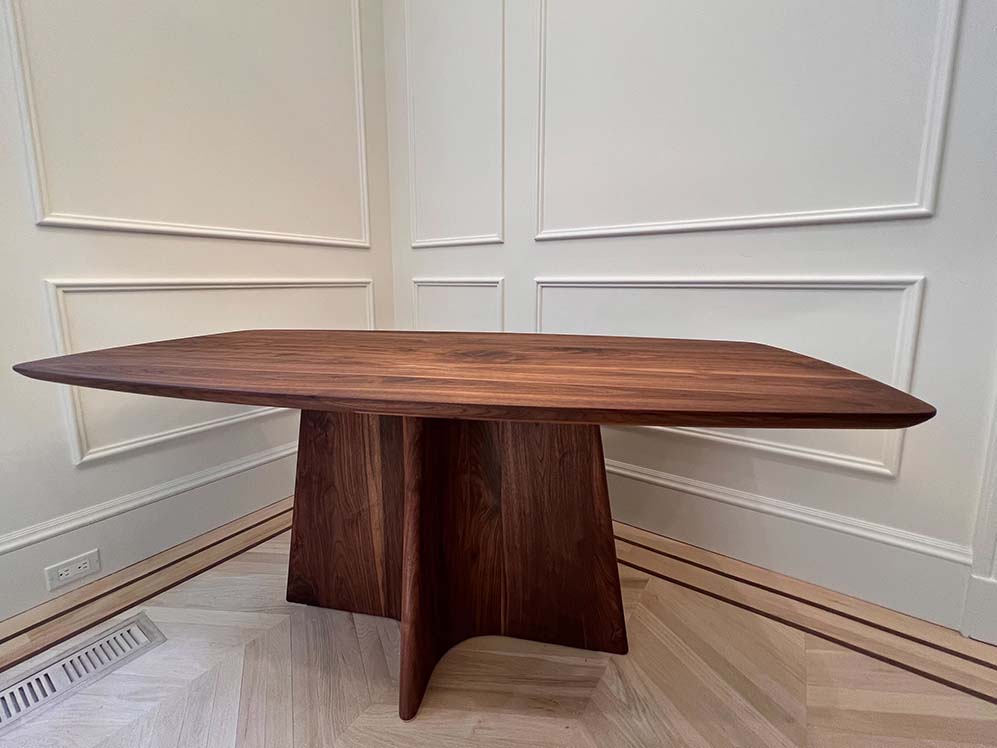
As usual it was way more work than anticipated, but I’m quite pleased with the final result. I had a to build a ridiculous number of jigs and templates for this thing. –Frank
After 4 months of hard work, Frank, a new member, and carpenter completed an absolutely show-stopping dining table in the workshop and posted images of the final piece on the Ace Community Discussion Board.
Prompted by the Ace Community, Frank also provided insight into his process and the many tools he used to design, sketch, render, and build his dream dynamic, curvy table.
I’ve only been woodworking earnest for about the past year. I dabbled with it in college as well but just a bit. Most of what I know has been from the school of YouTube or from talking with people around Ace, and being a mechanical engineer has helped with some aspects.–Frank
Check out some highlights from his build:
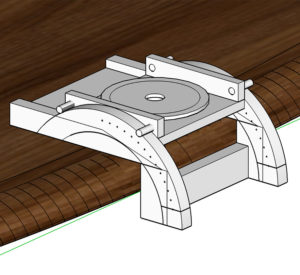
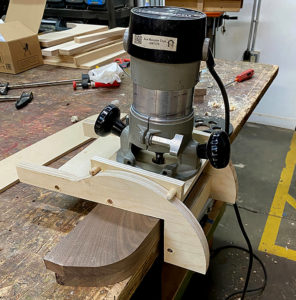
Frank built a “ridiculous” number of custom jigs for shaping the unique curves of his design. See how he takes his idea, renders it, builds it, and tests it below:
Rendered JigTesting the Jig
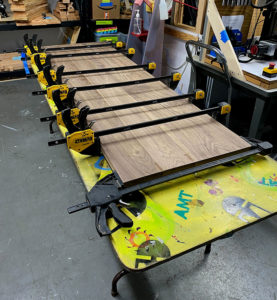
He also put together a super neat glue-up for the top of the table:
Super neat and tidy glue up
He even converted his living room into a stylish workshop and all that between his 10-month-old’s naps!
Frank’s living room converted into a workshop
The project may have been “way more work” than Frank thought it would be but, wow! Hopefully, he’s sending out dinner invites soon!
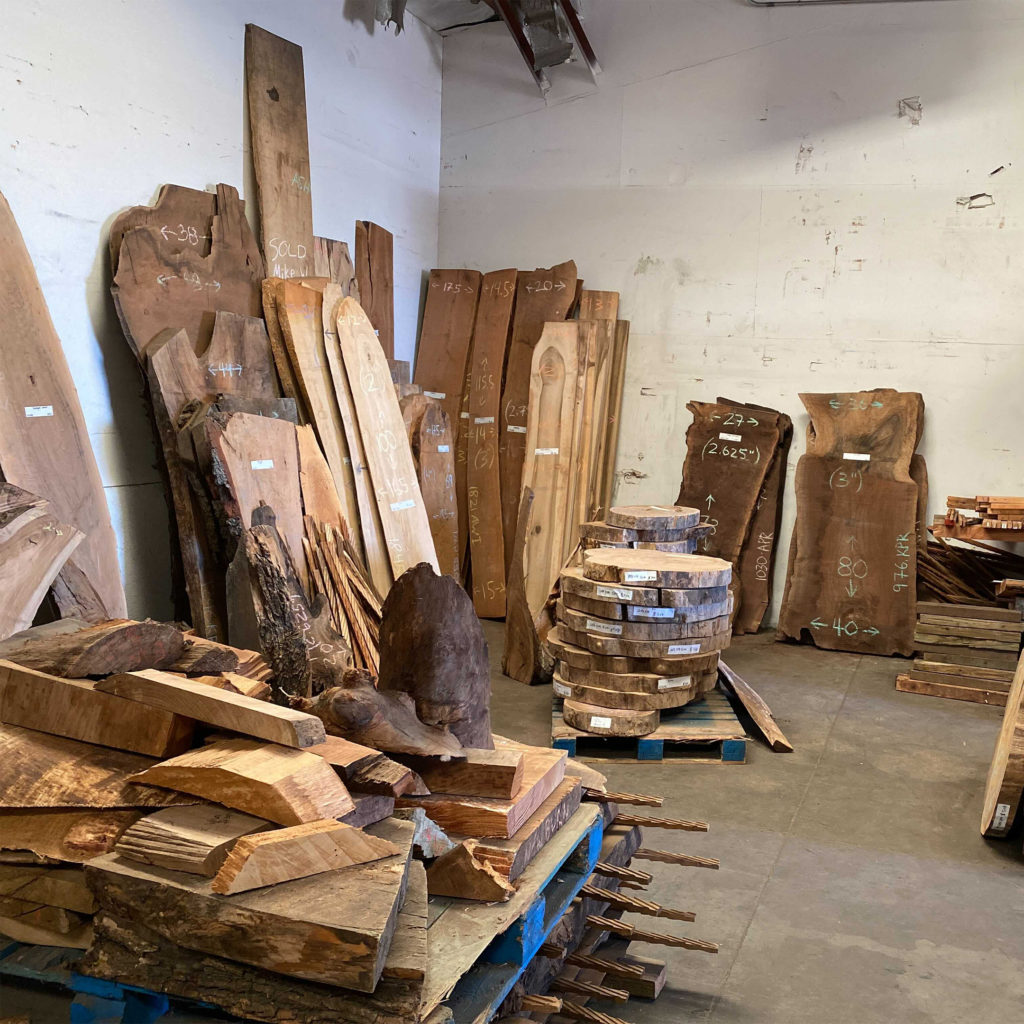
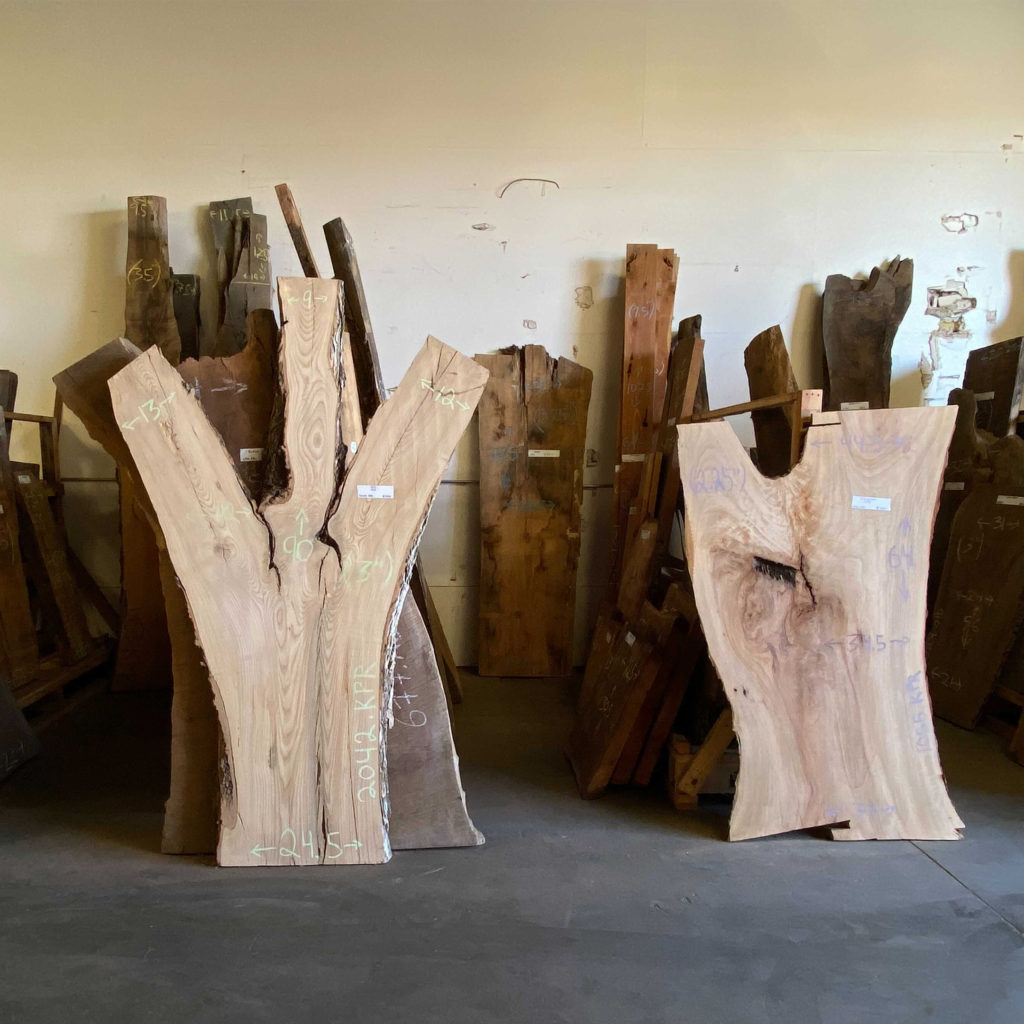
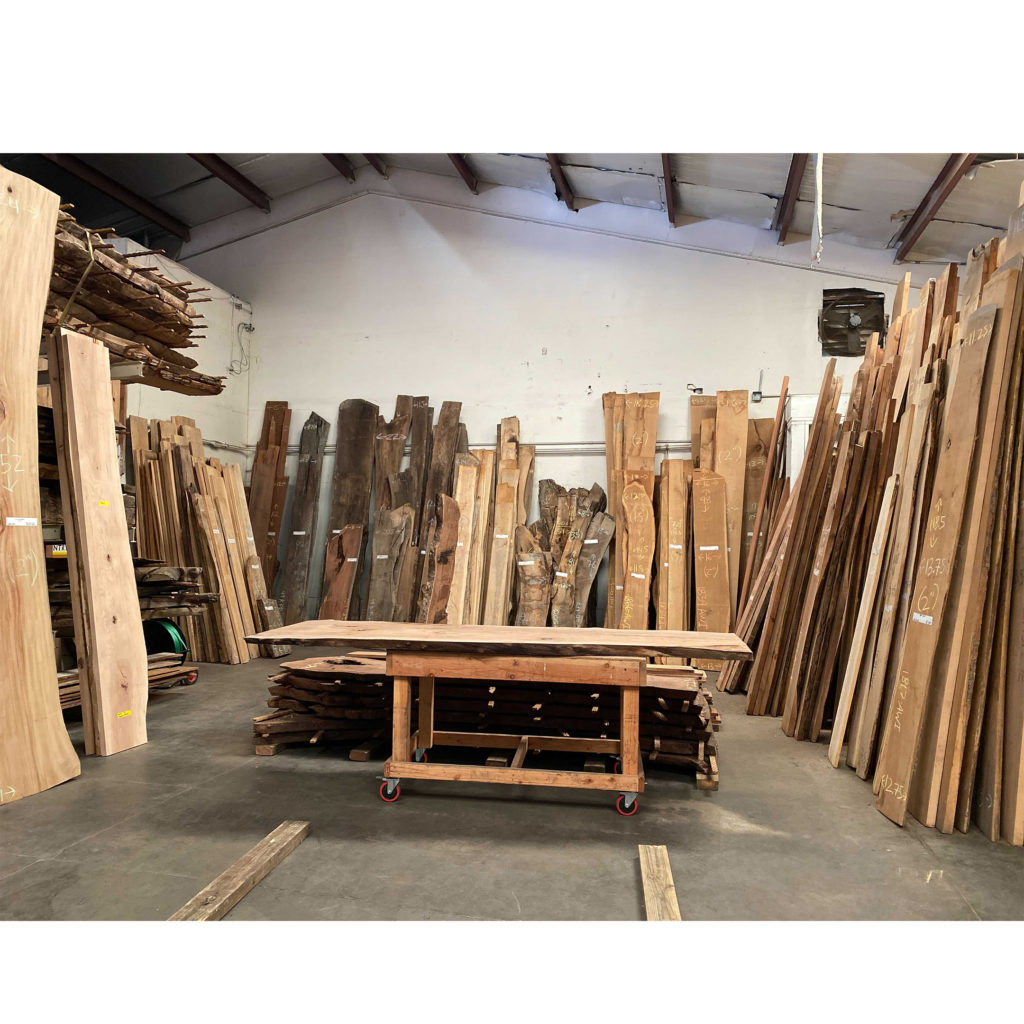
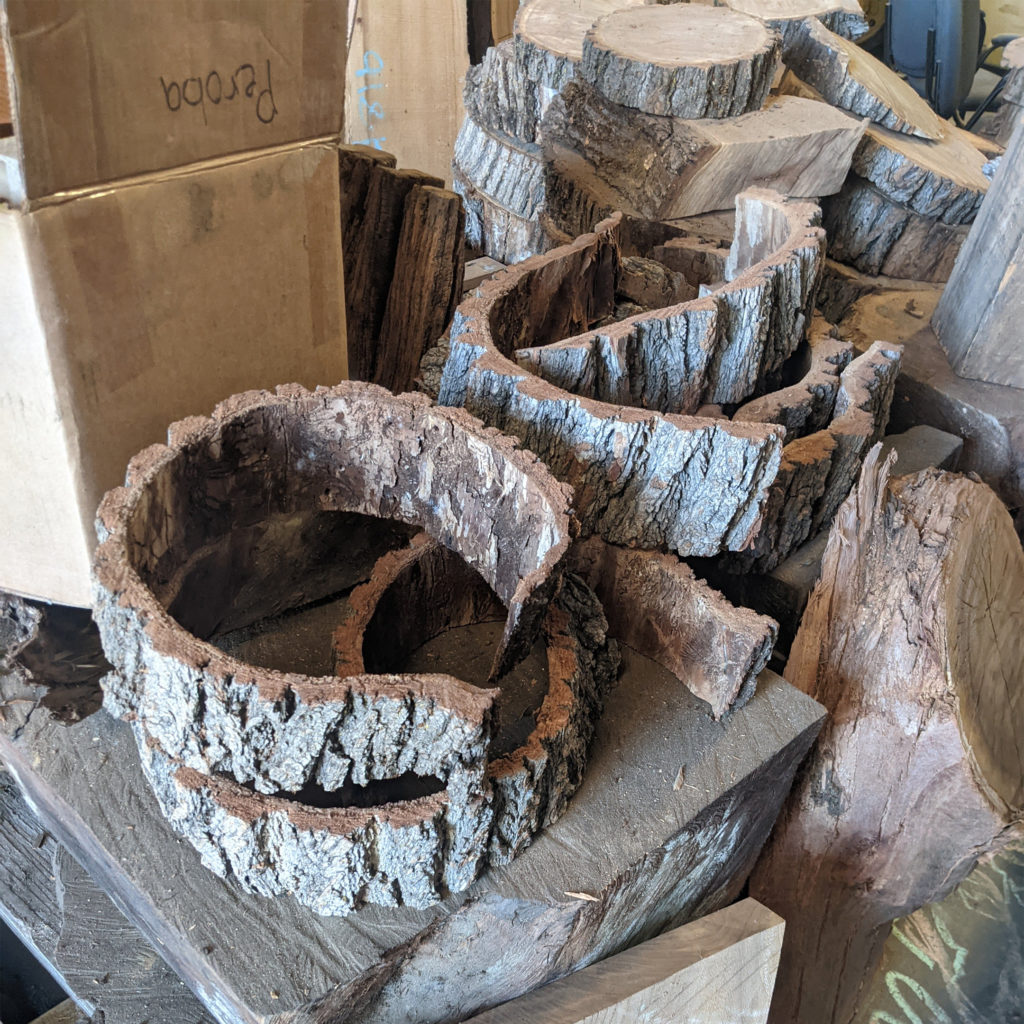
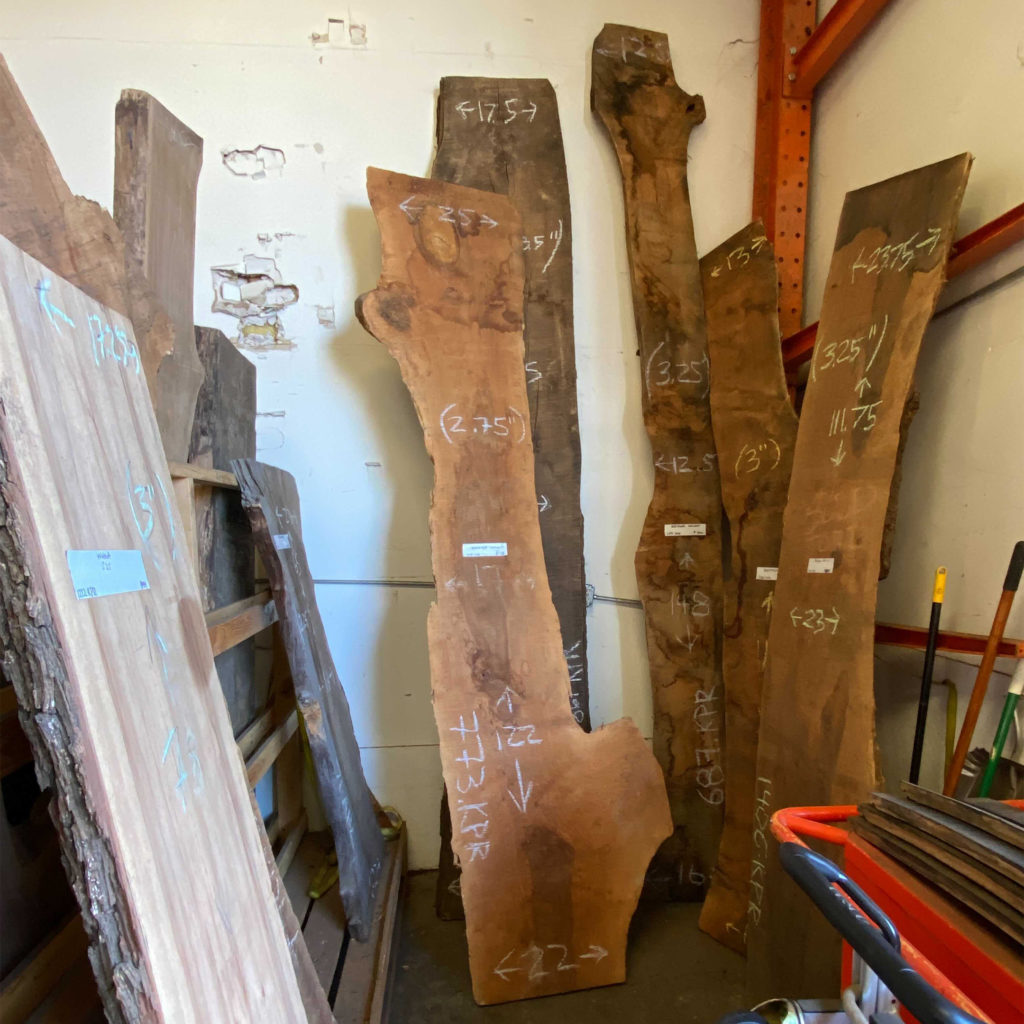
We recently went on a field trip To Peroba Reclaimed out in Richmond. They specialize in reclaimed lumber and live edge slabs ethically harvested. The staff was lovely and helpful. And really patient with us digging through their off-cuts pile. We were on a mission to get affordable wood to use in Ace project-based workshops. Not only did we find affordable products but really pretty options we can feel good about spending community money on. We definitely recommend going out there when you are ready to level up your solid wood projects.
Victor Lane may live in Sacramento, but he is still an active member of the Ace community. At Ace, Victor did a lot of woodworking with joinery, and over the past few years, he’s eventually made his way to becoming an instructor. I’m Carter Jenkins, and I had the pleasure of speaking with Victor to find out more about him.
Victor’s relationship with Ace began in a similar way to a lot of other members: finding an affordable and welcoming maker space. In his search, he found plenty of alternatives, but they were mostly for-profit organizations with narrowly defined communities that did not have a diverse environment. “You go to a lot of ‘maker spaces and it’s white guys my age making robots or 3d printing…” as Victor put it. He found that Ace fostered a group of people that was full of people that you wouldn’t find in those other maker spaces. Ace also had different technologies that you wouldn’t find in other maker spaces, such as fabric arts. He appreciates the fact that these “non-traditional” making practices have dedicated homes at Ace.
Two custom made coasters designed by Victor
Victor’s New Class at Ace
Victor is hosting an in-person woodworking class for a small group of people at the maker space. It’s a class he has hosted pre-lockdown, but luckily not a lot about the class had to change. Like before, he’s teaching how to make a basic cutting board out of a single piece of wood, teaching how to properly cut and finish the material. The main purpose of the class is not to walk away with a perfect cutting board but to rather learn how to use the tools properly. As Victor said, “If you are not scared of the power tool you are using, you probably shouldn’t be using it.” He believes that gaining a sense of respect is the most important thing that a maker should have for their tools. The class employs the use of the chop saw and table saw, which Victor hopes to make his students comfortable. For the most part, mask protocol isn’t affecting the class. Most of the time, the people in the class were wearing filtered dust masks, so modified masks are being used.
Talking with Victor was a blast, and the Ace community benefits greatly from having a guy like him in it. His charismatic personality and great communication skills make him an excellent teacher and should make for a great workshop experience.
Mauricio Salmerón has been working on a project recently. What started as a joke request to a friend has now spanned into a multi-month project that is now nearing completion. I got a chance to speak with Mauricio over a weekend and he shed some light on what other workshop members saw as two large pieces of wood glued together.
Mauricio has been an off-and-on member of the Ace Makerspace for a few years now. He used to own a furniture-making shop called “The Furniture Space,” where he did woodworking to create all kinds of custom furniture such as tables and sideboards. After that, Mauricio found Ace to be the best place to continue honing his craft.
A while back, Mauricio was talking with June, a friend of his. The conversation eventually drifted to June’s need for a new bed. After discussing how June’s search hadn’t been successful, Mauricio jokingly offered to build her a bed frame. The two laughed, and the conversation moved on. However, a month or two later June took Mauricio up on his half-serious request.
The bed frame, later in its construction phase
Mauricio worked on the project on and off, but many months later it’s nearly complete. Throughout his build process, Mauricio used many workshop tools to complete the project. The table saw, chop saw, router, drill, and planer to name a few. He estimates “another 10 hours of work and headboard assembly” and the new frame will be ready to send to June. The entire assembly consists of 5 main parts that can be put together to complete the full platform-style bed. June, of course, will have to provide the mattress, but it seems that the bulk of the work has been completed.
Process
Early pieces
Oak boards were surfaced through the joiner and planer, then dimensioned with the table saw
The boards were clamped together and glued to make the large sides of the bed, the tops to the sides with pocket screws
The three main pieces were completed by now, each with its own plywood support frame
Later pieces
The surfaced boards were put together with pocket screws and clamps to create the headboard
The last piece, the middle mattress support, was made with plywood, glue, and pocket screws
Final assembly
The three large oak pieces were attached with latches, the headboard had cleats and bolts to attach to the side pieces, and the middle mattress support piece
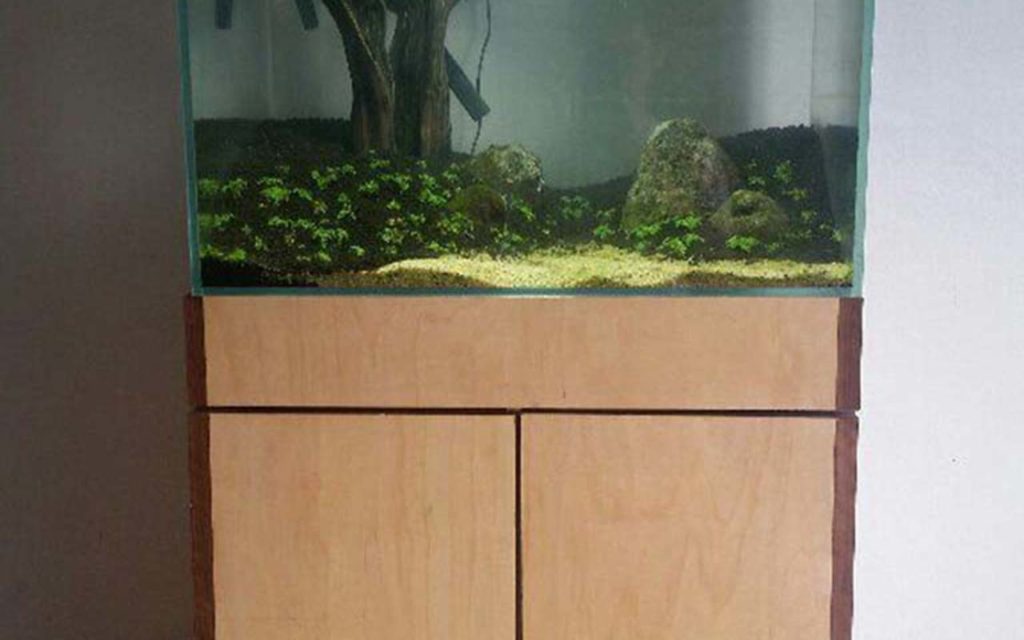
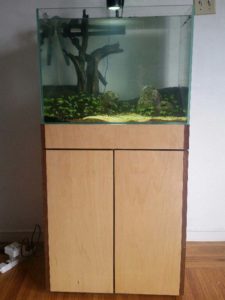
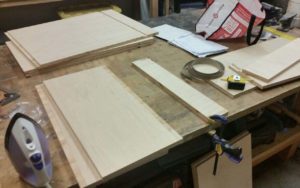
This is an aquarium stand that I built at Ace Monster Toys. It is made of maple 3/4 plywood and walnut edge banding. I used the old craftsman table saw and the ryobi router table to cut and shape the parts. If I had to do it over again I would use the CNC router. It would be far far safer, faster, and the results would be cleaner and more square. I would probably also use strips of 1/8″ walnut instead of the iron-on edge banding, because it would be much more durable and age better. After designing the piece in sketchup, I made some test pieces to practice edge banding on. The idea is to use the edge banding to hide the screws and the ugly edges of the plywood. It was a challenge to cut up the 4×8 sheet of plywood with a handheld power saw. A panel saw would have been better. After getting the pieces small enough to fit in my car, I took them to AMT and cut them to size on the table saw. The problem was that, even with my own brand new blade, the saw would not cut perfectly square, and the measurements on the fence were not accurate. It was very frustrating and the results were not perfect. I used the router table to cut dadoes and rabbets where the walnut strips would go. After assembling the box, I used an iron to iron on the walnut edge banding, which I trimmed with a razor. At this point I took the stand home for finishing, and added some wheels. The stand contains my canister filter and CO2 tank. I am very happy with the result, but if I had to do it over, I would use the CNC.
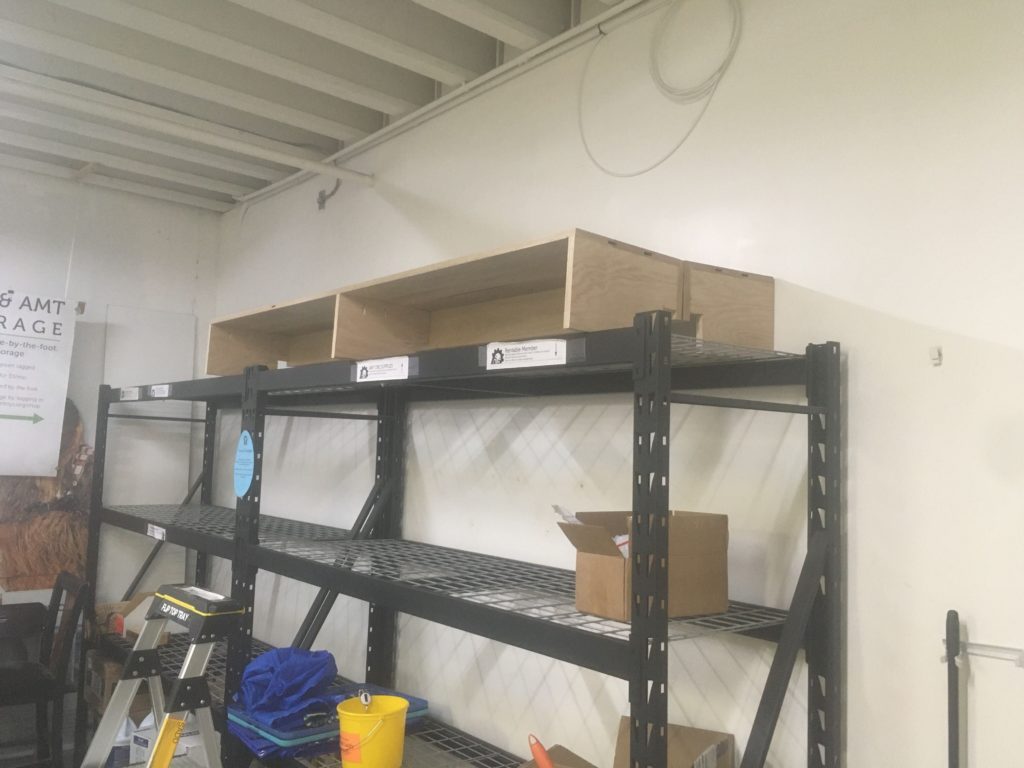
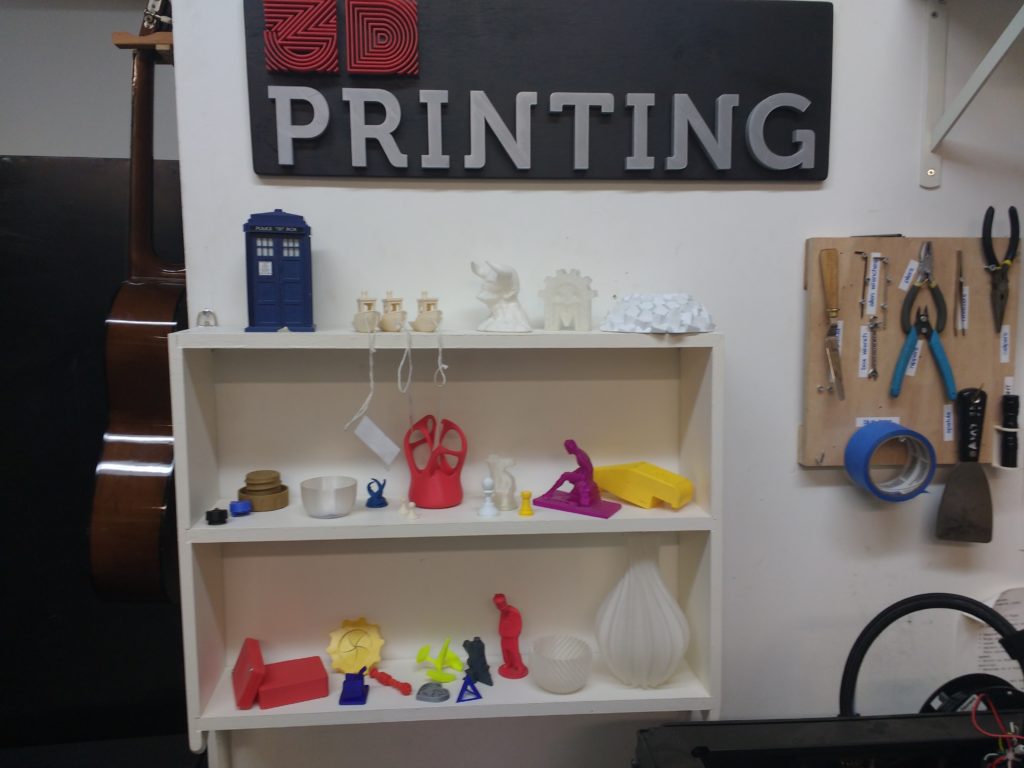
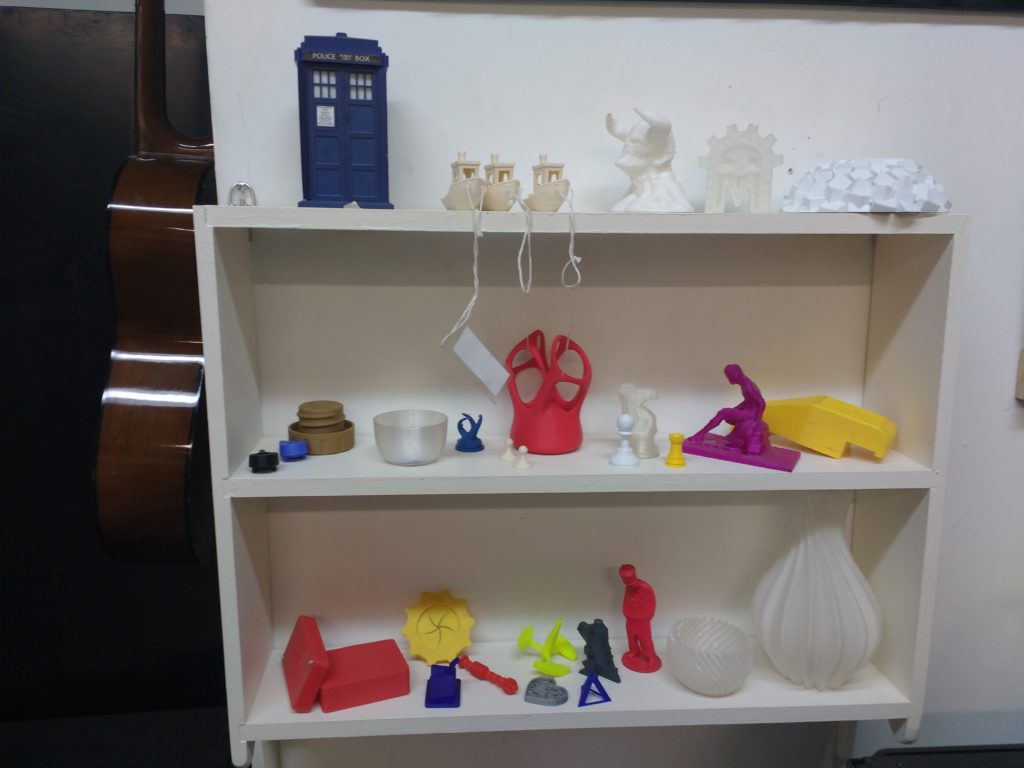
At last week’s Thursday gathering, I put out a general cry for help. We needed a better way to show off the various 3D print samples we’ve accumulated over the years.
Devon was there and rose to the challenge.
If you are looking for a project to hone your maker skills, just talk to your friendly neighborhood steward. I’m sure we all have a list of projects like this that will benefit the space.
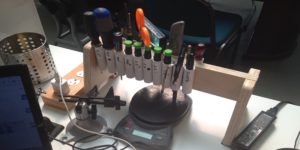
Having the right tools when you are puttering around making things is invaluable and having those tools near at hand is a wonderful thing. When revamping the Electronics Area and turning it into a place you are not afraid to work from the pit of darkness and despair it used to be, I noticed we didn’t have the necessary tools needed to do the job. Also we had no place to put said tools even if they where available, so I decided to m
odify the standard tool rack I developed for my workbench at home. It is a standard rack with basically vertical piece of wood between two frames, like an I beam. On each side of that vertical piece you put a collection of PVC tubing to hold whatever you want to hold. The trick is to have an idea of the tools you want to have on it and lay those out before hand, so you know what kind of tubing and how much you need. Some #6 screws, a drill press, bandsaw and CNC up the wood bits and away you go. Rubber feet on the bottom make sure it doesn’t slide away from you as you reach for that next screwdriver. The tools selected for the rack are based on my own experience in doing electronics and detail work. Precision screwdrivers are a must but so is a regular #2 Phillips and flathead. The #2 and #1 Phillips are probably used more than anything. From there it all makes sense to have enough tools but not too many. You can go crazy on the tool rack but it starts to get too large and would take over the tabletop if you let it. Keep it basic and know what you use.


 Victor Lane may live in Sacramento, but he is still an active member of the Ace community. At Ace, Victor did a lot of woodworking with joinery, and over the past few years, he’s eventually made his way to becoming an instructor. I’m Carter Jenkins, and I had the pleasure of speaking with Victor to find out more about him.
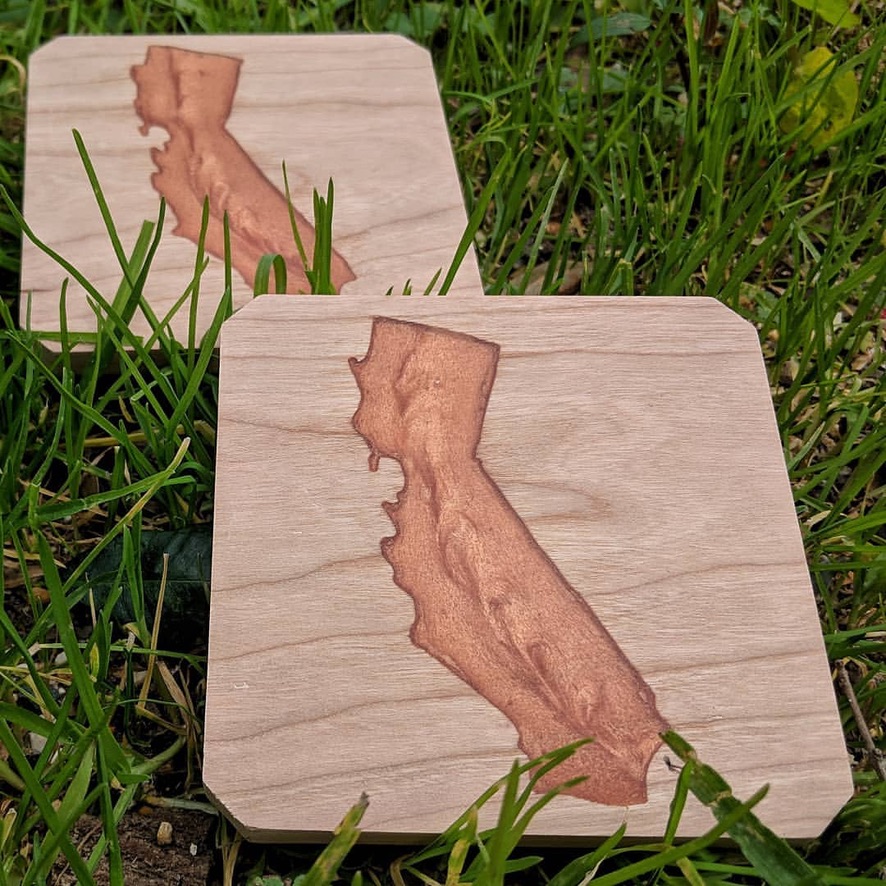

 This is an aquarium stand that I built at Ace Monster Toys. It is made of maple 3/4 plywood and walnut edge banding. I used the old craftsman table saw and the ryobi router table to cut and shape the parts. If I had to do it over again I would use the CNC router. It would be far far safer, faster, and the results would be cleaner and more square. I would probably also use strips of 1/8″ walnut instead of the iron-on edge banding, because it would be much more durable and age better. After designing the piece in sketchup, I made some test pieces to practice edge banding on. The idea is to use the edge banding to hide the screws and the ugly edges of the plywood. It was a challenge to cut up the 4×8 sheet of plywood with a handheld power saw. A panel saw would have been better. After getting the pieces small enough to fit in my car, I took them to AMT and cut them to size on the table saw. The problem was that, even with my own brand new blade, the saw would not cut perfectly square, and the measurements on the fence were not accurate. It was very frustrating and the results were not perfect. I used the router table to cut dadoes and rabbets where the walnut strips would go. After assembling the box, I used an iron to iron on the walnut edge banding, which I trimmed with a razor. At this point I took the stand home for finishing, and added some wheels. The stand contains my canister filter and CO2 tank. I am very happy with the result, but if I had to do it over, I would use the CNC.
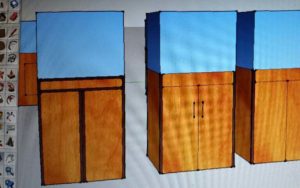
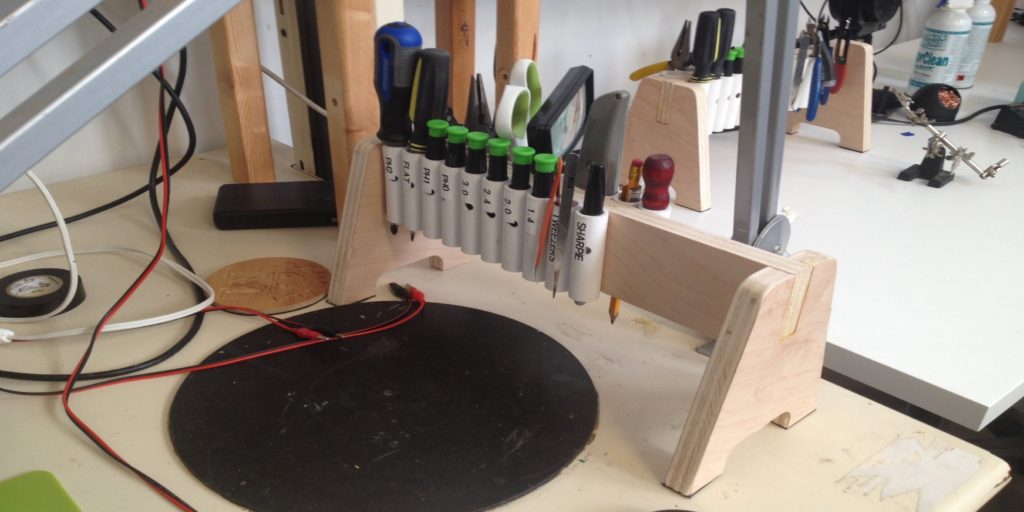
 you put a collection of PVC tubing to hold whatever you want to hold. The trick is to have an idea of the tools you want to have on it and lay those out before hand, so you know what kind of tubing and how much you need. Some #6 screws, a drill press, bandsaw and CNC up the wood bits and away you go. Rubber feet on the bottom make sure it doesn’t slide away from you as you reach for that next screwdriver. The tools selected for the rack are based on my own experience in doing electronics and detail work. Precision screwdrivers are a must but so is a regular #2 Phillips and flathead. The #2 and #1 Phillips are probably used more than anything. From there it all makes sense to have enough tools but not too many. You can go crazy on the tool rack but it starts to get too large and would take over the tabletop if you let it. Keep it basic and know what you use.