December 7th we started a new meet up for Fusion 360.
The group brainstormed on tool-path creation and resolved to develop an understanding of multi-stage CAM processes that can be used on the various mills, routers and cutters at AMT.
We had a terrific time at the hangout. Matt our 3D Printing steward and five others attended. All were quite experienced Fusion 360 users, in contrast to most of the previous Fusion meetings which tend to be weighted toward newcomers. I think everyone present was a AMT member.
We opted to pass the projector cord around and look at all of our projects as a group. Another approach might be to break off into twos or threes; maybe we’ll try it that way next time.
Bob showed us some renderings of cool guitar designs he’s been working on.
Rachel (aka Dr. Shiney) showed us a guitar body a client of hers needed cut; we struggled together for a while trying to figure out Fusion’s 3D tool-path generation. I think something like this would be a great thing to get Taylor’s input on: A multi-stage CAM process including facing, profiling, and 3D carving.
Emory gave us a quick look at his own CAM project, which involved re-mounting the workpiece to cut both sides: tricky stuff.
Chelsea showed us her silicone casting project. She’s come up with a pretty elaborate flask and core to be 3D printed. We’re all anxious to see the results, but those are going to be some long prints! I recommended smaller test pieces to get sizes and clearances right and generally experiment with the process before committing to the final design.
Matt brought along a bunch of finished projects you’ve probably seen before if you’re a regular at our Thursday meetings; nothing new, but all done in Fusion 360.
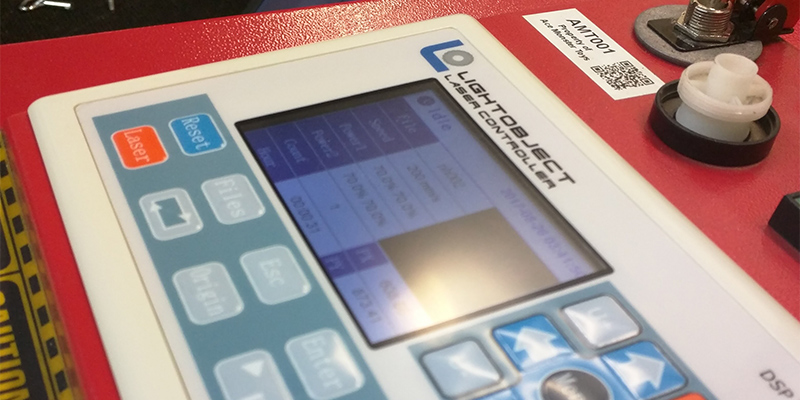
Our beloved Smaug (AKA the laser cutter) recently got quite the upgrade. More documentation and details will be published to the wiki but here are the highlights:
New controller
New HV power supply
New LV power supply
New drivers
New ground connection
Massive maintenance overhaul
New interlock on the hood
New seals
We also upgraded the electrical in the room to support the laser program and ease of use. (One switch to rule them all!)
What still needs to be done
There are two things we need to do before opening the laser up to member use. The first is build a new fob box to control access and collect data for billing. The second is develop education for user. We have a team of people working on the videos and materials to help users explore what is new about how the laser works. While we have a few folks working on the fob box we could use some support.
Both items are underway… join the conversation on slack.
How the new laser program will work
For both new and existing users not only is the software new but also how the fob box will work. Membership and a current certification will be required to fob in and use the laser. Additionally if you have overdue laser bills it may effect your ability to access the system.
New users
New users will still be required to take the AMT Laser 101 class. Once you have completed this 1.5 hour class you will be provided a link for a short online test. Once you have taken the course and passed the test you will be certified to being your adventures in laser cutting.
Existing users
If you have been certified to use the laser in the past your certification will still be active until October 25th. After that all old certifications will expire. To maintain your certification you should access prepared materials on what is new then take a short online test. Passing that text will renew your certification on the laser.
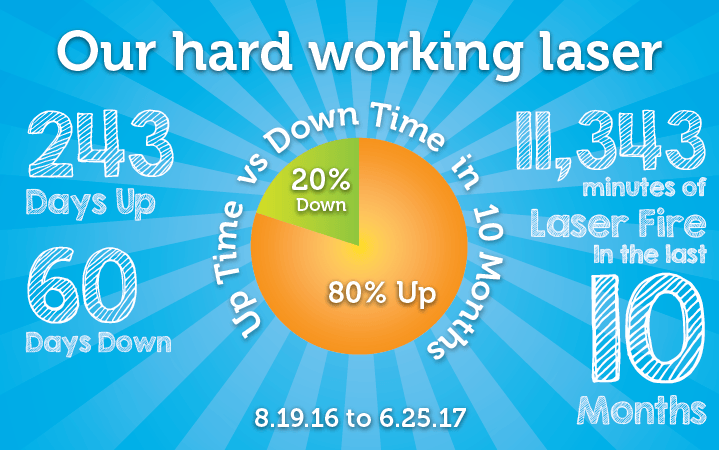
Human beings are conditioned to remember negative things more readily than positive. When it comes our laser the times it is not working stick out much more than the times it is. I got curious about how often it was really down vs how much it “felt” like it was down. So I went searching the logs for the real story.
What I found out was that for a heavily used volunteer run and maintained piece of equipment out laser does pretty good. When you factor in the make and model, years of community use and that it is all run and managed by volunteers 80% up time is nothing to sneeze at. This is thanks to great stewardship by Peter and a lot of effort by dedicated volunteers.
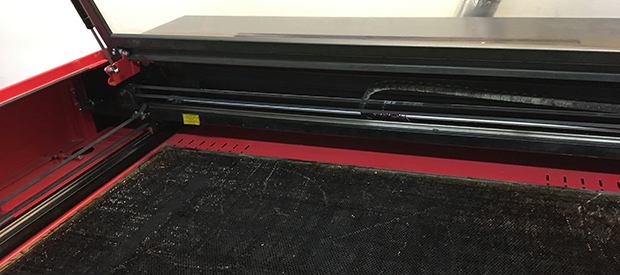
Charred wood dust mixes with the glues in plywood and protective tape to stick to the inside surfaces of the laser cutter. Over time, this contributes to the smell in the laser room. A chain smoker who never bathes isn’t the best roommate, so lets go over a few cleaning steps for the AMT laser…
Hi! I’m Devon. Some of you have probably seen me cutting many, many box joints into big plywood sheets in the woodshop, or basking in flux fumes kludging my way through a never ending procession of circuit boards in the electronics section. You may even have found yourself wondering what I was building!
I’ve mentioned to anyone willing to listen that I’m building a synthesizer, but what I’m building might not be exactly what you picture a synthesizer to be.
If you make it to the end I’ll share another little sound bite.
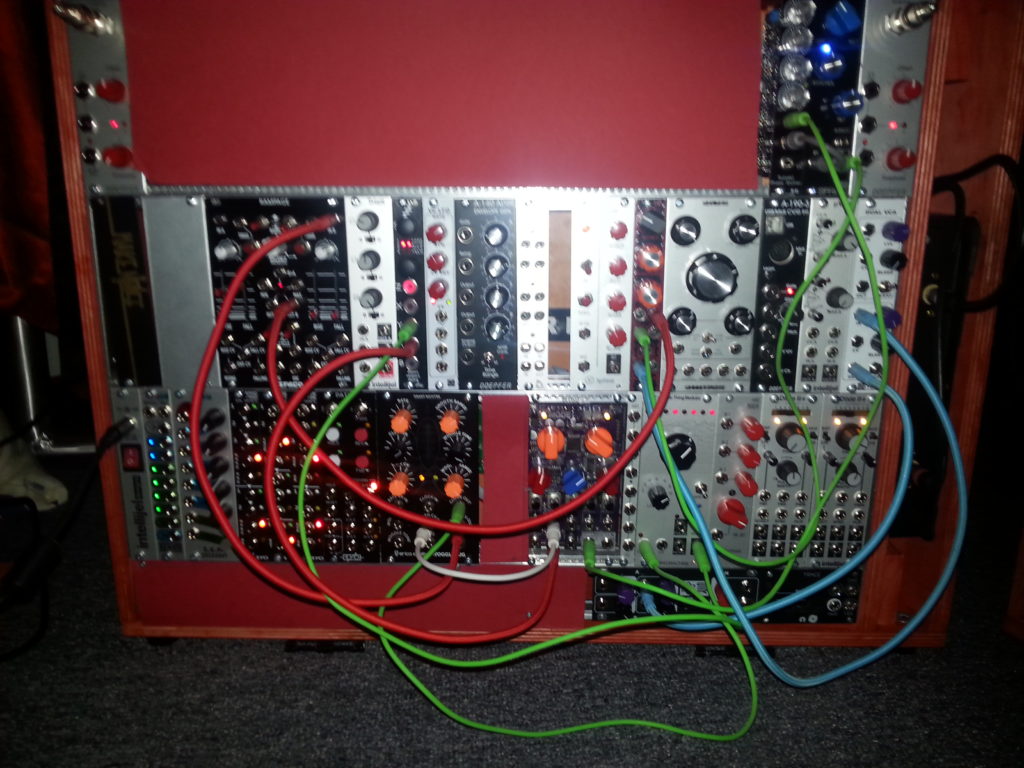
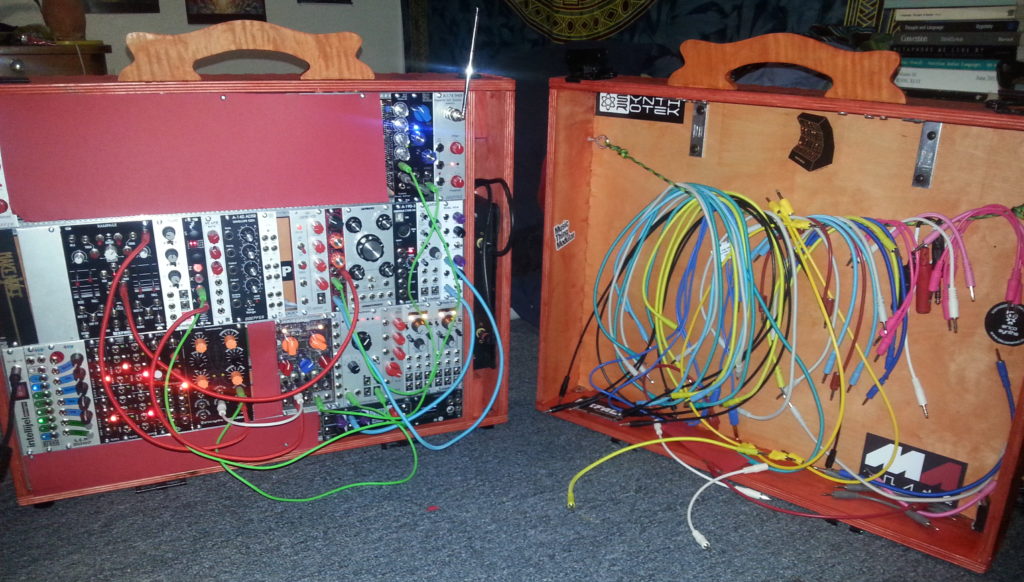
And here’s a picture of it:
That red stuff is construction paper. The other things are modules, because this is a modular synthesizer. Within the realm of synthesis and auditory exploration, there are a particularly geeky few who are really into analog gear. Even more myopic and esoteric than them is us: the modular synth crowd.
It’s pretty arcane stuff, so I’ll spare you the details, but in essence a modular synthesizer is one which, in contrast to a conventional fixed architecture synth, has no fixed architecture. That’s what those colorful patch cables are for: the signal chain on a modular is created (patched) in-the-moment by the user according the ancient and venerable dictum of “outputs to inputs”. This provides a kind of sonic flexibility that is difficult to achieve through the more regular method: pretty much any output can go into pretty much any input. It’s nuts; trust me.
Modular synths have been around a long time. The first synthesizers were modular. This instrument, if you want to call it that, adheres to a particular format called Eurorack, which is the new kid on the block.
The Box
Anyways, all those fancy modules need to go in something. As I live in a tiny apartment, I need to put this thing away when I’m not using it. So I decided to build a case with a lid, which provides the added benefit of the thing being somewhat portable.
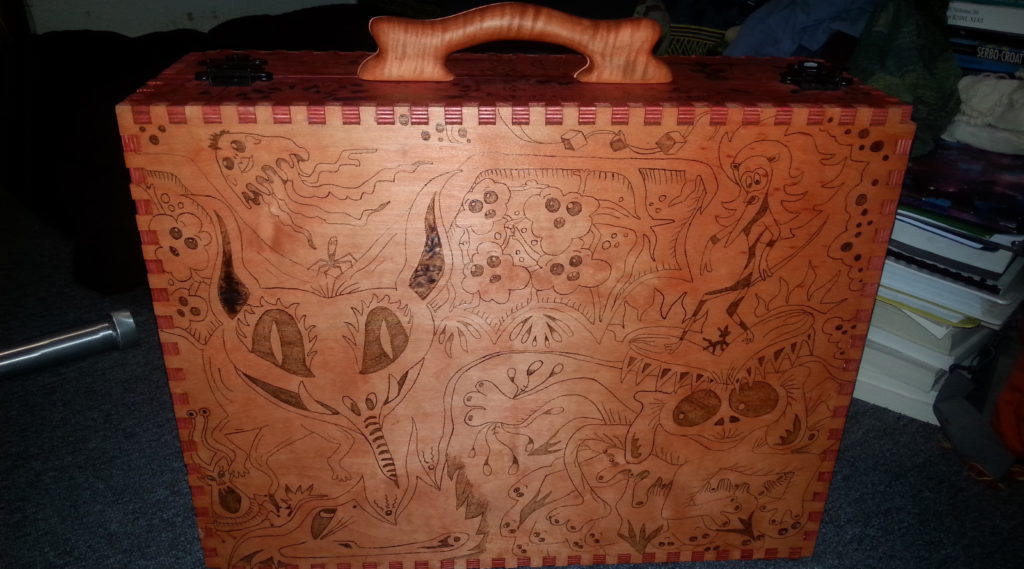
There’s a picture of it! It is constructed from 1/2″ Baltic Birch ply. The handle on the top there is made from curly maple, but more on that later.
Building the box was my first step into Synth DIY (SDIY). And, like everything in life, it took a lot longer than I thought it would.
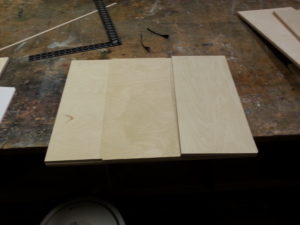
First step was cutting the sheets down to size.You can’t tell from that image there, but by this phase I had already made my first crucial mistake. This mistake would turn out to be a stroke of genius, though (more on that in a minute). The panel saw in the workshop is a thing of beauty — thanks Davey!
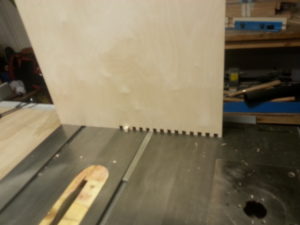
I would like to take a moment to apologize to all the hard-working folk in the coworking space who got to listen to hours and hours of “zhne, zhne, zhne, zhne” as I cut out all those little box joints with the dado blade.
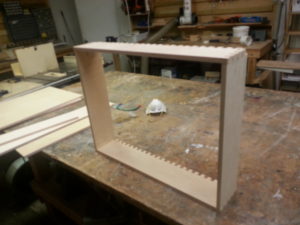
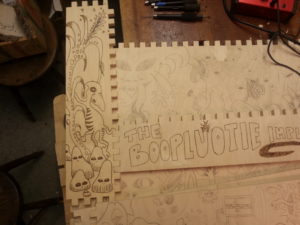
Eventually I got all the teeth cut in, and mostly aligned. I would have to take a file to them to give them enough clearance for the glue, though, since I didn’t really take that into account during the set up. In the background there you can see my trusty box joint jig. It looks sort of like a castle!
Once all the pieces were cut out, the real work could begin. Most of those drawings were done by my lovely partner and companion Katie, who is a better drawer than me. I contributed though! I arted what would become the top panel here in the time it took her to do the rest of the thing. The design was drawn in with pencil, and then I spent an unbelievable amount of time wood-burning them in with a pyrography pen. I could have got a certificate in the time it took me to do this.
But it was all totally worth it, because it looks pretty sweet. Heres a nice little side-by-side.
Once the wood burning was done, and my burned-to-shit thumb was all bandaged up, it was time to apply the dye. I used alcohol-soluble dyes, which due to the higher rate of evaporation do not cause the the grain to raise like water-based dyes. They’re a bit trickier to use for that same reason, though. I think I did a decent job.
Then it was time to glue it up! This stage was pretty scary, what with there being now dozens of hours invested in the project. Thankfully, I barely screwed it up at all.
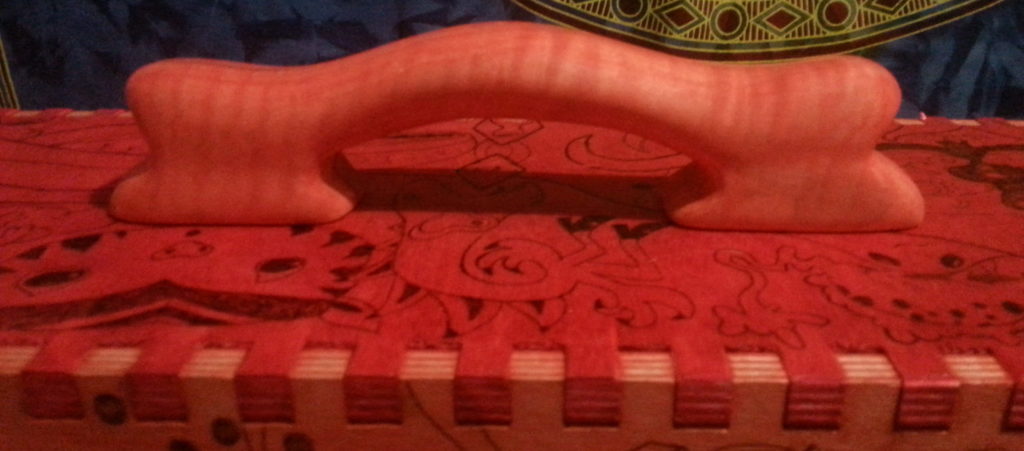
Once the glue had dried, it was time to kick it up a notch. I had purchased an assortment of hardware from Reliable Hardware, including a really bogus cheap little suitcase handle. What a shame it would have been to have topped off all my hard work with a flimsy stupid little thing. Obviously, I had to make a handle.
My woodcarving teacher Sheri helped a lot at this point. We designed the shape, and then glued two pieces of curly maple together, with a sheet of thick paper in between them. Once that had dried, we did a rough cut on the bandsaw, and then I spent close to 10 hours rasping, riffling, and sanding the thing down to the proper shape and luster (and, of course, splitting it back into its constituent halves). During this time I listened to a really interesting book about the history of the Mp3. Then came a coat of that dye, and a nice shiny layer of beeswax and oil finish. If anyone wants a cheap plastic suitcase handle, let me know.
Remember how I said that I made a big mistake early on that ended up being a blessing? Well, somehow I managed to dimension the whole thing to be two inches too long, and about two inches too tall. Isn’t that hilarious? Now the frame for my rack wasn’t going to fit.
But guess what! That two inches on the side is just enough space to fit in a compartment for a spring reverb tank! Yeah, just like your guitar amp has! Except this reverb tank is mounted vertically. And I managed to find exactly one reverb tank on the whole internet designed for vertical mounting, and that sucker just fits. You can see it on the right hand side of the synth in the picture below.
As for that extra bit of height? I turned that into lemonade too by adding a little mini-row at the very bottom. Currently it’s mostly cardboard, but I will fill it with little handy utility type things.
My next step was to throw a little rope across the lid side of the case from which to hang my many colorful cables. The lid was designed so as to be able to fit over the synth while the thing is fully patched. There is a certain sand-painting quality to modular synthesis, in that there are no saved presets in this town. When you pull the plug, the plug pretty much stays pulled.
The Electronics
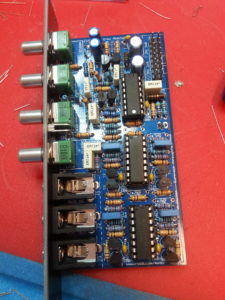
I’m not an electrical engineer and I am only learning how to read circuits. The first soldering iron I touched was upstairs at AMT. So I’m no expert. I did not build all the modules you see in that case, but I did build half of them. And with the help of resident synth legend Matt (@mhz), I’ve been learning a ton. The plan is to fill the rest of the case with stuff I’ve built myself, which is going well. I wish I had picked up the soldering iron sooner.
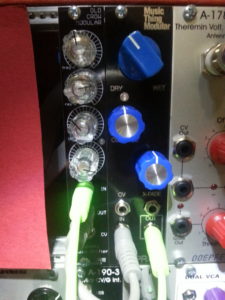
One of my favorite parts is picking the knobs! Here’s a picture of my most recently stuffed board, and a picture of it nicely mounted in the case (next to it is the reverb module that interfaces with the afore-mentioned spring tank). It’s a phase shifter! A clone, in fact, of the popular Small Stone guitar pedal from the 70s.
Behold my impeccable taste for knobs!
A really cool thing about the SDIY scene is that a lot of designers release their circuits to the community open-source style. Which is an awesome learning resource, and makes everything very hackable.
The Future
Going forward, I’m going to continue assembling modules. Over the past few months I went from buying assembled units, to buying kits, to buying PCBs and panels and sourcing my own components. Soon I will get certified for the incredible Laser Cutter (!), and then I will foray into doing my own acrylic panels, which will give me the opportunity to delve deeper into the DIYness.
I spend more time building the synth than I do playing it. SDIY is as much of a hobby as the music/sound design itself. I have decided not to fight this, and am learning how to read schematics, so that I can hack them, and maybe someday come up with my own designs that I can re-release back into the open-source SDIY ecosystem.
So there it is. Thanks for reading. If you want to geek out in greater depth about the nature of modular synthesis or synthesis in general, I’m pretty approachable, and you can slack me @devogenes.
Today we enter the retail version of a gastrointestinal tract (IKEA, Emeryville) for materials that can be safely laser cut and engraved; for personalized holiday gifts and a smokey way to void the return policies.
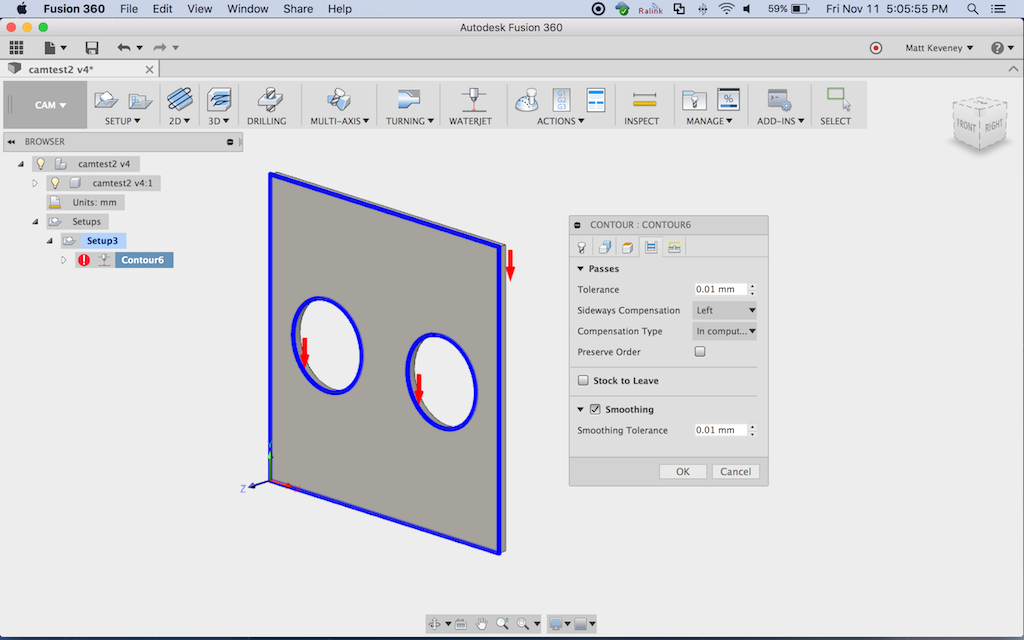
Recall that Ray noticed I had made no provision to cut holes in parts before cutting the part free. This can be done in the laser control software (Lasercut 5.3) by creating two layers. Select all the holes for the first layer; the part perimeters for the second layer. Both layers should be configured for cutting with the same power and speed settings.
I noticed that I seemed to be getting proper cut order nonetheless. I inquired about this on the Fusion 360 CAM forum. Sure enough, it turns out that Fusion 360 attempts to order the inner perimeters first by design.
You can manually override the cut order by checking ‘preserve order’ on the ‘passes’ tab of the contour operation (screenshot above). The cuts will then be performed in the order the contours were selected.
You could also create two contour operations, selecting the inside perimeters on the first one. This essentially reproduces the above technique using Fusion 360 instead of Lasercut 5.3. I would prefer this method if I had to carefully control the cut order for a complex model; especially one that might change over time.
But for a complex project there can be a lot of paths to select. It’s a tedious step at best, even without this extra worry. My plan is to let Fusion 360 do its thing and double check with the ‘simulate’ function. So far it hasn’t let me down.
Don’t edit the DXF!
Note that Fusion’s control over the order of operations ends with the DXF file. If you edit the DXF later, by manipulating things within Lasercut or some other tool, all bets are off.
I generally do use Lasercut’s ‘unite lines’ tool before cutting, but this does not seem to affect the cut order. In fact, I’m not sure it’s really necessary. I haven’t tested without performing the ‘unite lines’ step.
Smoothing
I strongly recommend using the ‘smoothing’ feature, also located on the ‘passes’ tab. Without it, Fusion 360 will reduce everything to line segments, greatly expanding the size of the DXF. With smoothing on, ARC objects are emitted where appropriate. The simple example above (a rectangle with two circular holes), resulted in the following file sizes:
Smoothing on:   1166 bytes
Smoothing off: 22538 bytes
Hope that helps. If you want to try it out and need a hand, let me know!
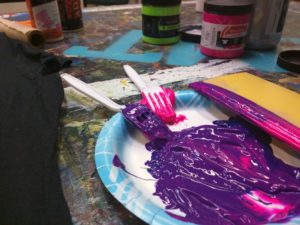
Today we put down the exacto knife and fire up the laser to create some custom die cut stickers. Name of the game is alignment, patience and a Master Chef level of logo placement. Read more
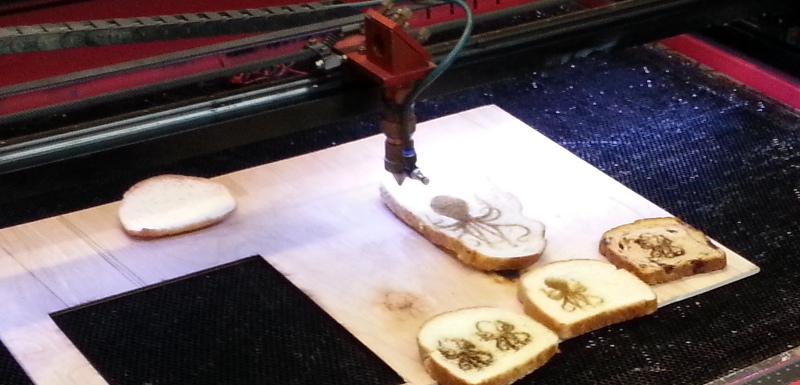
Last open house, we made deity toast for Experimental Science Time. People were invited to bring a slice of bread and an image to burn into it, with our 80-watt CO2 laser cutter. It’s our light of creation.
There were hopes that we might get some classic deity-on-toast imagery. But instead of a pantheon, one entity stole the show. The AMT Kraken.
The Bread
Assorted white bread
Sourdough bread
Cinnamon raisin bread (bonus challenge stage)
The Backing
Plywood, for easy clean up
Methods
Etching
Cutting
Cutting, multiple passes
Sourdough etch in progress.
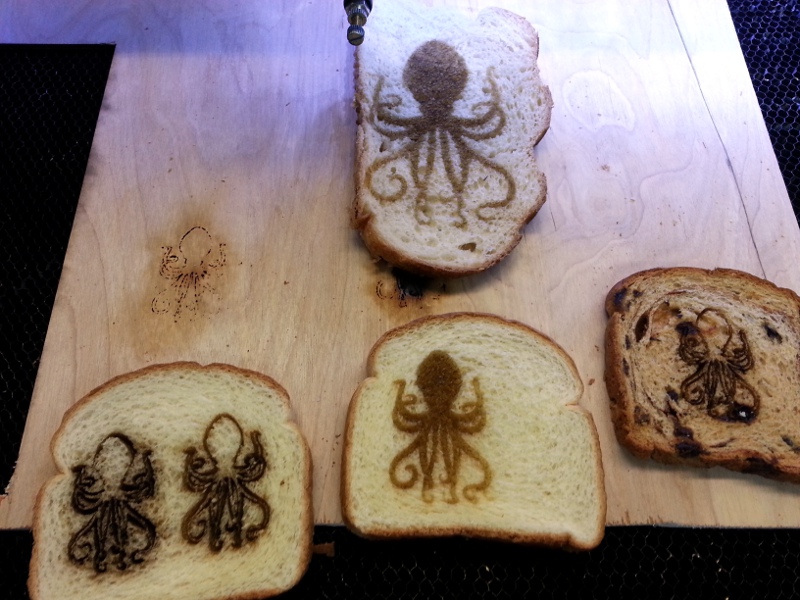
What we found
Etching
Bread is inconsistently thick. It’s foamy texture means some areas are like tall cell walls, whereas other areas have little to stop the laser from shooting through.
We played it safe at first, with fairly low power. But perhaps due to the water content in the bread, the laser wasn’t leaving much visible markings. We bumped up the power, and got the solid-filled etched piece of toast in the middle.
Clockwise from the bottom middle: First etch on white bread. White bread with single and double vector cuts. Sourdough etch. Cinnamon raisin vector cut.
Time to try a vector cut!
We cut the bottom left slice. Too much power, or perhaps too little speed, yielded the smokey image on the bottom left. The bread was over-toasted, and the wood backing was hit hard enough to smoke up the bread from below. Doesn’t look good, and probably tastes like death.
We moved the laser over to the right side of the slice, dropped the power, and went for two vector cutting passes. It came out much cleaner. More passes with less power would probably be even better.
White bread behaved nicely, as did the big sourdough slice. Cinnamon raisin bread was an interesting mix of materials. We didn’t have a brave volunteer to taste test, to tell us which was more burnt, the bread or the raisins. Visually, both came through on our cut, so I’m sure the kraken was pleased.


 Eventually I got all the teeth cut in, and mostly aligned. I would have to take a file to them to give them enough clearance for the glue, though, since I didn’t really take that into account during the set up. In the background there you can see my trusty box joint jig. It looks sort of like a castle!
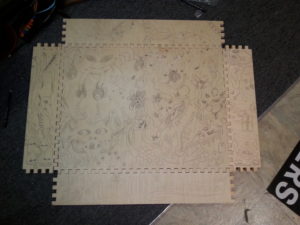
 But it was all totally worth it, because it looks pretty sweet. Heres a nice little side-by-side.
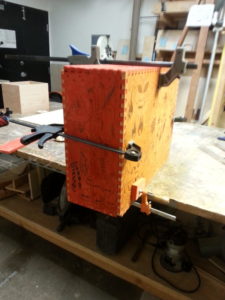
 Behold my impeccable taste for knobs!

