
As some of you know, besides my Tool Steward duties in the ATM Metal Shop, I also have a similar role with the Eastbay Astronomical Society. I help take care of their metal shop located up at Chabot Space & Science Center. One of the key tools up there is a 1964 Monarch 10EE Toolroom Lathe, which was donated by the USDA a few years back.
This is an amazingly accurate and powerful lathe that has all kinds of useful features and functions, one of which is a taper attachment. A taper attachment is an accessory for a lathe that, as the name implies allows one to cut very accurate tapered parts. For example, the tailstock of AMT’s Jet 9×20 lathe has an #2 Morse taper socket into which can be plugged all sorts of centers, drill chucks, drill bits, etc. Unfortunately, one pice of the taper attachment for the Monarch lathe was missing when we got it, and the that has prevented using it. My project is to create a replacement for this part, which is a bracket that securely attaches the sliding part of the taper attachment to the bed of the lathe.
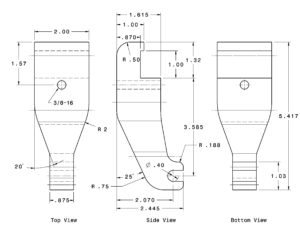
A bit of research on the web found this drawing of what the original looked like
 It looks like kind of a complicated part to make, and the material would be expensive, so I decided to try a 3D printed prototype to make sure it will fit. First I created a model in Fusion 360 based on the measurements in the drawing. I haven’t tried this before, but I think you can view the model at http://a360.co/2iXVoIu.
Then I 3D printed it on AMT’s Makerbot. Here’s what I got
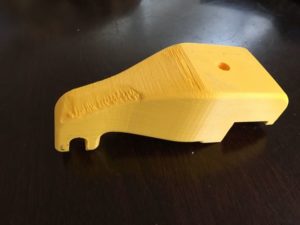 I then took this plastic version of the bracket up to the lathe to try it on for size. Good thing I did because it didn’t fit. The arm of the bracket was too long for my lathe and I would have wasted a big chunk of aluminum of I had just dived right in. Perhaps Monarch made multiple versions of the lathe over the years and the plan I found was for a different one? Anyway, I corrected the model, printed out another version and this time it fit perfectly. It’s time to commit to metal!
Drove down to Gorilla Metals in Hayward and bought enough 2″ x 2.5″ Al to make 2 since I figured I would screw up somehow. Also found a bunch of nice materials in their cutoff pile, paid for it all, put the scrap in my car, and drove home, leaving the actual bar I had driven all the way there for on the counter. Next day drove back, and picked it up with some mild ribbing from the friendly folks at the counter.
First thing to do was to cut a 5.5″ piece of the 12″ bar I had brought home. Turns out the 10 TPI blade for the horizontal bandsaw is terribly dull, and after 5 minutes had barely made a dent. Time to order some new blades for that thing. So then moved to the vertical bandsaw to see if that was better. Definitely! Was done in about 5 minutes.
Just like wood from the lumber yard, extruded aluminum bars are not flat and square when you get them, so clamped my raw stock into the milling machine vise, loaded up a fly cutter, and proceeded to flatten and true up all 6 faces making a close to a perfect rectangular block as I could. The fly cutter left some marks, but not too bad, but it may be time to take a closer look at the tram of our mill. the column seems tilted ever so slightly towards the front. A project for the new year.
Next post will discuss a bit about CAM and workholding for turning this blank into the actual part.